

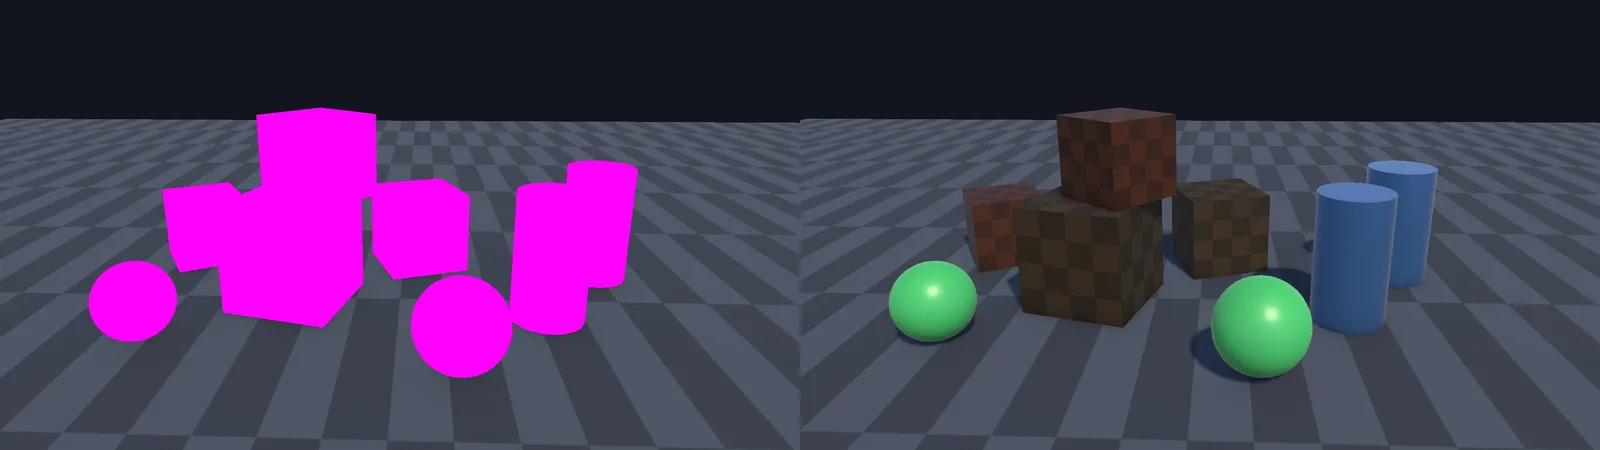
You open a project, import an asset pack, or switch to the Universal Render Pipeline, and half your scene turns a violent shade of pink. Nothing is broken beyond repair. Pink (Unity calls it magenta) is Unity’s way of saying “I can’t draw this material with the render pipeline you’re using.” This guide explains exactly why that happens in Unity 6 and walks through every fix: converting Built-in materials to URP or HDRP, handling read-only model materials, repairing custom shaders and Shader Graphs, and the trickier case where materials are only pink in a build.
Quick answer
Pink (magenta) materials mean the material’s shader doesn’t match your render pipeline, usually Built-in Standard materials in a URP project. In Unity 6, open Window > Rendering > Render Pipeline Converter, choose Built-in to URP, tick Material Upgrade (and Read-only Material Converter for imported models), click Initialize Converters and then Convert Assets. Custom shaders need replacing by hand.
Why Materials Turn Pink in Unity
Every material points at a shader, and every shader is written for one or more render pipelines. Unity 6 ships with three:
- Built-in Render Pipeline (BiRP): the original pipeline. The
Standardshader,Legacy Shaders/*,Mobile/*and hand-written surface shaders belong here. - Universal Render Pipeline (URP): the default for new projects and the pipeline Unity is actively developing. Its main shader is
Universal Render Pipeline/Lit. - High Definition Render Pipeline (HDRP): high-end PC and console rendering, with its own
HDRP/Litshader.
When the active pipeline can’t find a compatible pass in a material’s shader, or the shader fails to compile, Unity renders the object with its internal error shader (Hidden/InternalErrorShader), which is solid magenta. So “pink” always means one of three things:
- The material uses a shader written for a different pipeline (by far the most common case).
- The shader has a compile error.
- The shader or one of its variants isn’t available on the current platform or in the current build.
This matters more in 2026 than it used to. Unity began formally deprecating the Built-in Render Pipeline with Unity 6.5, and recommends URP for all new projects. More and more tutorials, templates and Asset Store packs now assume URP, so mixing old Built-in content into a new project is the number one source of pink materials.
60-Second Diagnosis
Click one pink object, look at its material in the Inspector, and match what you see:
| What you see | Likely cause | Fix |
|---|---|---|
Shader is Standard, Legacy Shaders/... or Mobile/..., project uses URP/HDRP |
Built-in material in an SRP project | Convert the materials |
| Everything is pink, including brand-new materials | Pipeline asset missing or mismatched | Check Graphics and Quality settings |
| Material fields are greyed out and can’t be edited | Material embedded in an FBX/model file | Extract or use the read-only converter |
Shader name is custom (e.g. Custom/Water) and the converter skips it |
Hand-written Built-in or surface shader | Port the shader |
| A Shader Graph material is pink | Graph has no target for your pipeline | Add the Universal or HDRP target |
Shader is HDRP/Lit in a URP project (or the reverse) |
Asset made for the other SRP | Reassign to your pipeline’s Lit shader |
| Fine in the Editor, pink in the build | Shader stripped or not included | Build-only fixes |
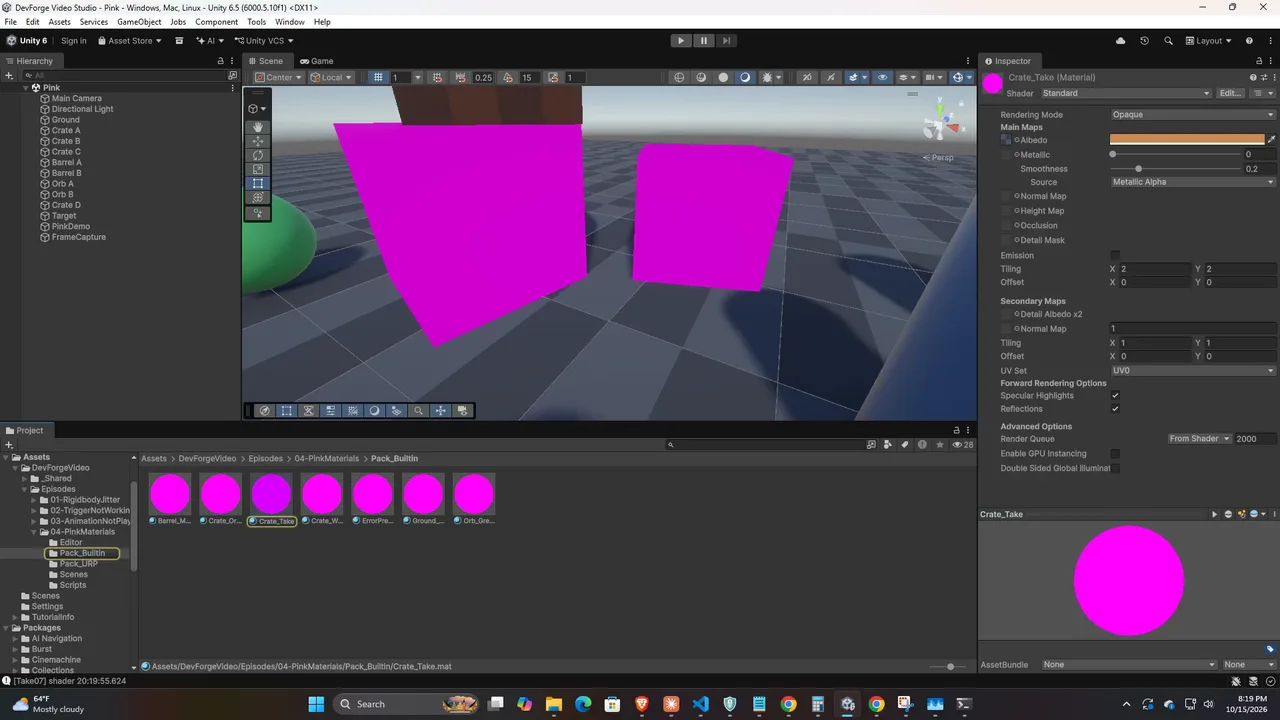
Step 1: Check Which Pipeline Is Actually Active
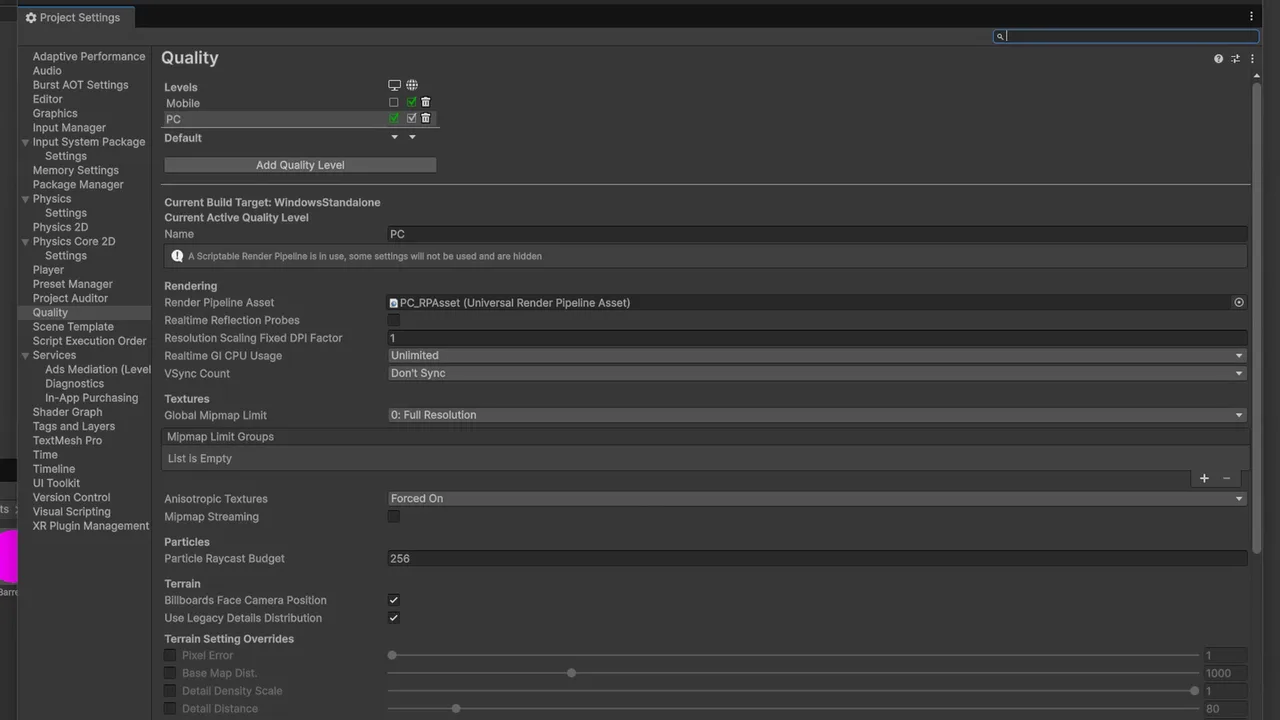
Before converting anything, confirm what Unity thinks your pipeline is. Two settings control it, and the second one quietly overrides the first:
- Edit > Project Settings > Graphics > Default Render Pipeline. If this field is empty, the project is using the Built-in pipeline. If it holds a URP or HDRP asset, that pipeline is the default.
- Edit > Project Settings > Quality, then select each quality level and look at its Render Pipeline Asset field. A value here overrides the Graphics default for that quality level.
The classic trap: a project has a URP asset on the “High” quality level only, and the Graphics default is empty. On your desktop everything looks right, but on a phone that starts on “Low” quality, Unity falls back to the Built-in pipeline and every URP material turns pink. Either set the Graphics default to your URP asset, or make sure every quality level has one.
You can also check from code. This prints the pipeline that is active right now:
using UnityEngine;
using UnityEngine.Rendering;

public class PipelineCheck : MonoBehaviour
{
    void Start()
    {
        RenderPipelineAsset rp = GraphicsSettings.currentRenderPipeline;
        Debug.Log(rp == null
            ? "Active pipeline: Built-in Render Pipeline"
            : "Active pipeline: " + rp.GetType().Name + " (" + rp.name + ")");
    }
}
GraphicsSettings.currentRenderPipeline already takes the current quality level into account, so this is a reliable way to confirm what a device is really using.
Step 2: Convert Built-in Materials to URP
If your materials use Built-in shaders and your project uses URP, Unity can convert most of them automatically. Back up first (commit to Git or copy the project folder). The conversion rewrites material assets and can’t be undone with Ctrl+Z.
Using the Render Pipeline Converter (whole project)
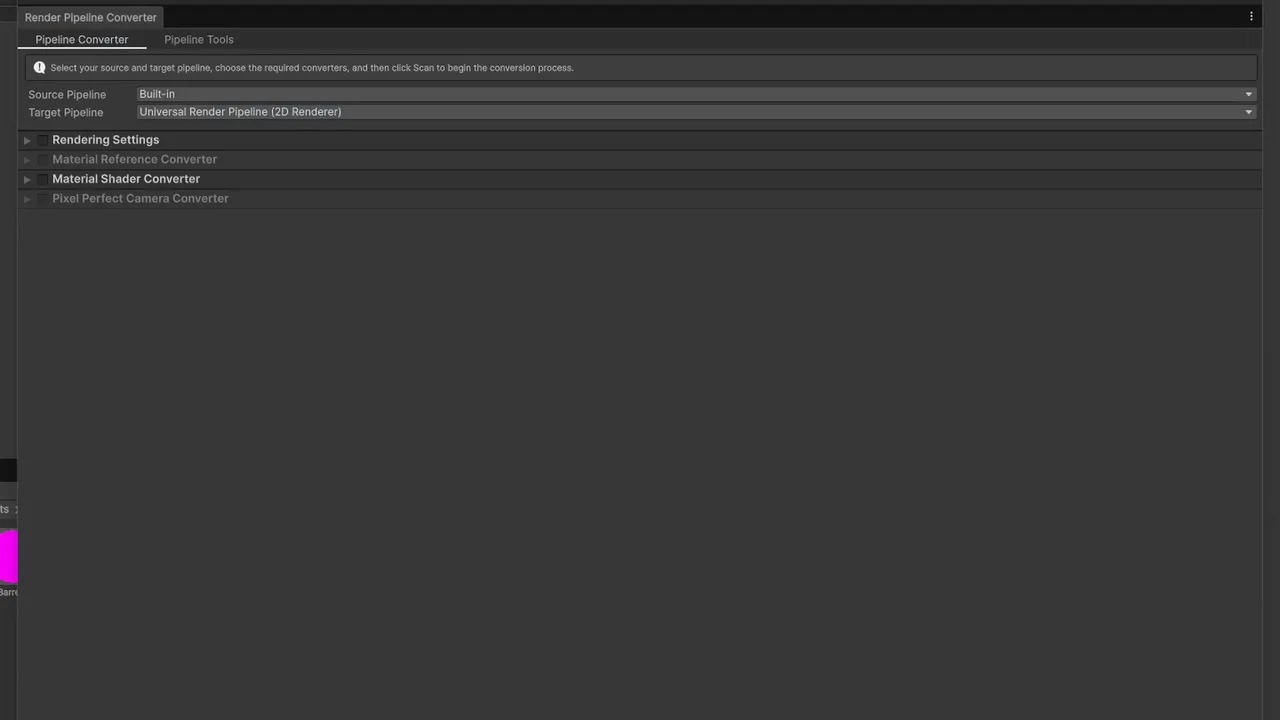
- Open Window > Rendering > Render Pipeline Converter.
- In the dropdown at the top, choose Built-in to URP.
- Tick the converters you need. For pink materials the important one is Material Upgrade. Also tick Read-only Material Converter if you have materials inside model files, and Rendering Settings if you’re converting a whole Built-in project (it creates URP assets from your quality settings).
- Click Initialize Converters. Unity scans the project and lists every item it can convert.
- Review the list, untick anything you want to leave alone, then click Convert Assets.
The converter maps the common Built-in shaders like this:
| Built-in shader | URP shader |
|---|---|
| Standard, Standard (Specular setup) | Universal Render Pipeline/Lit |
| Standard Terrain | Universal Render Pipeline/Terrain/Lit |
| Particles/Standard Surface | Universal Render Pipeline/Particles/Lit |
| Particles/Standard Unlit | Universal Render Pipeline/Particles/Unlit |
| Legacy and Mobile shaders (Diffuse, Specular, Bumped, Cutout, Transparent…) | Universal Render Pipeline/Simple Lit |
Converting only selected materials
For a single imported pack you don’t need to scan the whole project. Select the material assets in the Project window, then use Edit > Rendering > Materials > Convert Selected Built-in Materials to URP. In Unity 6.3 and later the menu items are pipeline-neutral: Convert Selected Built-In Materials to Current SRP and Convert All Built-In Materials to Current SRP.
After converting
- Check smoothness. Built-in Standard stores smoothness in the metallic or albedo alpha channel. The converter keeps the setting, but materials sometimes look shinier or flatter than before. Adjust the Smoothness slider rather than re-converting.
- Re-check emission. Emissive materials may need the Emission checkbox re-enabled and, for glow, a Bloom override on a Volume (URP post-processing is set up through Volumes, not the old Post Processing Stack v2).
- Look at the skybox. The Built-in
Skybox/ProceduralandSkybox/6 Sidedshaders work in URP, so a pink skybox usually means a custom skybox shader. - Terrain. If the terrain is still pink, open the Terrain’s settings (gear tab) and set its material to one using
Universal Render Pipeline/Terrain/Lit.
Converting to HDRP Instead
HDRP doesn’t use the Render Pipeline Converter for materials. Use the Edit menu:
- Edit > Rendering > Materials > Convert All Built-in Materials to HDRP converts every compatible material in the Assets folder.
- Edit > Rendering > Materials > Convert Selected Built-in Materials to HDRP converts only the materials selected in the Project window.
- Edit > Rendering > Materials > Convert Scene Terrains to HDRP Terrains swaps terrain materials in the open scene.
HDRP has extra limitations: it can’t convert materials outside the Assets folder, height-mapped materials usually need their displacement settings re-tuned, and it doesn’t support the old particle shaders at all (Unity provides particle Shader Graphs in a sample package). Also note that Unity announced in 2026 that HDRP is moving to maintenance mode while URP gets new features. For a new small or mid-sized project, URP is the safer long-term choice.
🛠 Check pipeline support before you buy assets
Most pink-material headaches come from Asset Store packs built for a different pipeline. Every tool in our list shows URP compatibility, and the Asset Store page has a “Render pipeline compatibility” table you should check before purchasing.
Pink Materials on Imported Models (Read-Only Materials)
If you select a pink model’s material and every field is greyed out, the material lives inside the model file (FBX, OBJ, glTF). Unity can’t edit embedded materials, so the normal Material Upgrade converter skips them. You have two options:
- Extract them. Select the model in the Project window, open the Materials tab in the Import Settings, click Extract Materials… and choose a folder. The materials become normal
.matassets that the converter (or you) can change, and the model is remapped to use them automatically. - Use the Read-only Material Converter in the Render Pipeline Converter (URP). It remaps embedded Built-in materials to URP equivalents without extracting them.
Extraction is usually better if you’ll tweak the materials later, because you get editable assets you can commit to version control.
Custom Shaders and Shader Graph
The converters only understand Unity’s own built-in shaders. Anything custom needs manual work.
Hand-written surface shaders
If a shader file contains #pragma surface, it’s a surface shader. Surface shaders only exist in the Built-in pipeline; URP and HDRP don’t support them at all, so no setting will make them render. Your options, from easiest to hardest:
- Swap the material to
Universal Render Pipeline/Lit(or Simple Lit/Unlit) if the custom shader was only doing standard shading. - Look for a URP version from the original author. Many Asset Store shaders ship a separate URP package inside the asset.
- Recreate the effect in Shader Graph (Window > Package Manager, it’s included with URP). This is the most future-proof option.
- Rewrite the shader in HLSL using URP’s shader library.
For reference, here is a minimal working URP unlit shader you can use as a starting point. It draws a texture multiplied by a colour:
Shader "DevForge/URP Unlit Texture"
{
    Properties
    {
        [MainTexture] _BaseMap ("Base Map", 2D) = "white" {}
        [MainColor] _BaseColor ("Base Color", Color) = (1, 1, 1, 1)
    }
    SubShader
    {
        Tags { "RenderType" = "Opaque" "RenderPipeline" = "UniversalPipeline" }

        Pass
        {
            HLSLPROGRAM
            #pragma vertex vert
            #pragma fragment frag
            #include "Packages/com.unity.render-pipelines.universal/ShaderLibrary/Core.hlsl"

            struct Attributes { float4 positionOS : POSITION; float2 uv : TEXCOORD0; };
            struct Varyings  { float4 positionHCS : SV_POSITION; float2 uv : TEXCOORD0; };

            TEXTURE2D(_BaseMap);
            SAMPLER(sampler_BaseMap);

            CBUFFER_START(UnityPerMaterial)
                float4 _BaseMap_ST;
                half4 _BaseColor;
            CBUFFER_END

            Varyings vert (Attributes IN)
            {
                Varyings OUT;
                OUT.positionHCS = TransformObjectToHClip(IN.positionOS.xyz);
                OUT.uv = TRANSFORM_TEX(IN.uv, _BaseMap);
                return OUT;
            }

            half4 frag (Varyings IN) : SV_Target
            {
                return SAMPLE_TEXTURE2D(_BaseMap, sampler_BaseMap, IN.uv) * _BaseColor;
            }
            ENDHLSL
        }
    }
}
The "RenderPipeline" = "UniversalPipeline" tag and the URP Core.hlsl include are what make it a URP shader. Putting properties inside the UnityPerMaterial CBUFFER keeps it compatible with the SRP Batcher.
Pink Shader Graph materials
A Shader Graph only generates code for the pipelines listed as targets. A graph downloaded from a Built-in or HDRP project may not have a URP target at all. Open the graph, open the Graph Inspector (top-right button), go to Graph Settings, and under Active Targets click + and add Universal (or HDRP). Save the asset. If the graph uses nodes that only exist in one pipeline (some HDRP-only master stack blocks, for example), you’ll see errors on those nodes that must be replaced.
If a graph shows errors after upgrading Unity, open it once and save. Shader Graph re-generates the shader for the new version, which clears most “pink after upgrade” cases.
Editor Tool: Find Every Pink Material in the Project
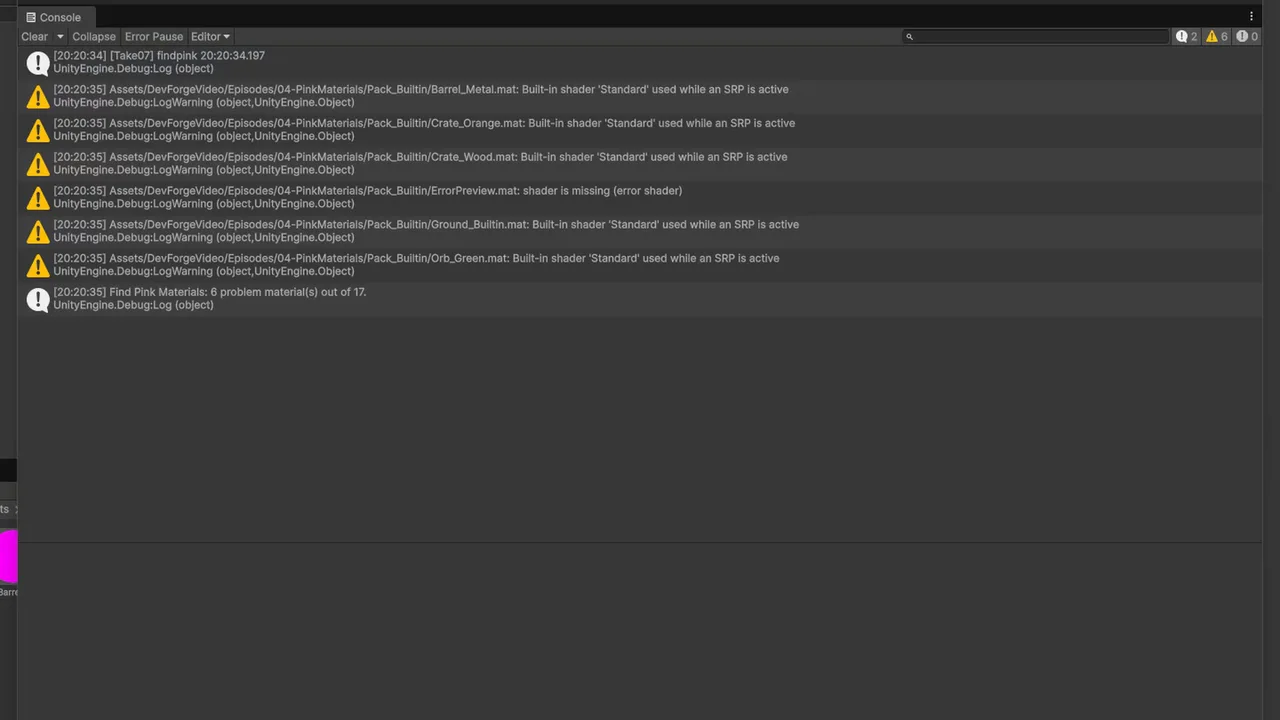
On a large project it’s hard to know how many materials are affected. Drop this script into any folder named Editor. It adds Tools > DevForge > Find Pink Materials, which lists every material whose shader is missing, has errors, or is a Built-in-only shader while an SRP is active. Click a line in the Console to select the material.
using UnityEditor;
using UnityEngine;
using UnityEngine.Rendering;

public static class FindPinkMaterials
{
    [MenuItem("Tools/DevForge/Find Pink Materials")]
    static void Find()
    {
        bool srpActive = GraphicsSettings.currentRenderPipeline != null;
        string[] guids = AssetDatabase.FindAssets("t:Material", new[] { "Assets" });
        int found = 0;

        foreach (string guid in guids)
        {
            string path = AssetDatabase.GUIDToAssetPath(guid);
            Material mat = AssetDatabase.LoadAssetAtPath<Material>(path);
            if (mat == null) continue;

            string reason = GetProblem(mat.shader, srpActive);
            if (reason == null) continue;

            found++;
            Debug.LogWarning($"{path}: {reason}", mat);
        }

        Debug.Log($"Find Pink Materials: {found} problem material(s) out of {guids.Length}.");
    }

    static string GetProblem(Shader shader, bool srpActive)
    {
        if (shader == null) return "no shader assigned";
        if (shader.name == "Hidden/InternalErrorShader") return "shader is missing (error shader)";
        if (ShaderUtil.ShaderHasError(shader)) return $"shader '{shader.name}' has compile errors";
        if (!shader.isSupported) return $"shader '{shader.name}' is not supported on this platform";

        if (srpActive)
        {
            string n = shader.name;
            if (n == "Standard" || n == "Standard (Specular setup)" ||
                n.StartsWith("Legacy Shaders/") || n.StartsWith("Mobile/") ||
                n.StartsWith("Nature/") || n == "Particles/Standard Surface")
                return $"Built-in shader '{n}' used while an SRP is active";
        }
        return null;
    }
}
Passing the material as the second argument to Debug.LogWarning is what makes the Console line clickable. The Built-in name list covers Unity’s own shaders; a custom surface shader shows up under “has compile errors” or looks normal in the list, so check any remaining pink custom shaders by hand.
Materials That Are Only Pink in a Build
If the Editor looks perfect but a build (especially a mobile or WebGL build) shows pink, the shader itself is fine. It just isn’t making it into the build correctly. Check these in order:
- Quality levels. Re-check Step 1. Builds often start on a different quality level from the Editor, and a level with no pipeline asset falls back to Built-in.
- Shaders only referenced from code. If you create materials at runtime with
Shader.Find("..."), Unity has no way to know the shader is needed and strips it. Either reference a material that uses the shader from something in a scene, put the material in aResourcesfolder, or add the shader to Project Settings > Graphics > Always Included Shaders. - Stripped variants. URP strips shader variants for features that are turned off in your URP assets. If a feature is only enabled on one quality level’s URP asset, variants may be missing on others. Make the relevant feature consistent across the URP assets you ship.
- Asset Bundles or Addressables built before you switched pipelines still contain the old materials. Rebuild them after converting.
- Graphics API. Check Player Settings > Other Settings > Graphics APIs. A custom shader with
#pragma only_renderersor#pragma exclude_renderersmay exclude the API the device uses (Vulkan, OpenGL ES 3, Metal, WebGPU).
For a Development Build, the player log tells you which shader failed. See the messages below.
Troubleshooting Specific Messages
WARNING: Shader Unsupported: ‘…’ – All subshaders removed
This appears in the player log (or Editor console) when no SubShader in the shader can run on the current GPU or pipeline. Usually it’s a Built-in or HDRP shader in a URP build, or a shader that targets a graphics API the device doesn’t have. It’s often followed by “Did you use #pragma only_renderers and omit this platform?” Convert or replace the shader; don’t just add it to Always Included Shaders, which only helps when the shader is valid but stripped.
The Render Pipeline Converter finds nothing to convert
Make sure you picked Built-in to URP in the dropdown and ticked Material Upgrade before clicking Initialize Converters. If the list is still empty, your pink materials aren’t using Unity’s built-in shaders. Check the shader name: it’s a custom shader, a Shader Graph without a URP target, or an HDRP shader, none of which the converter handles.
Even a brand-new material is pink
A new material gets the pipeline’s default shader. If that’s pink, the pipeline itself is broken: the URP package may be missing or failed to compile (look for red errors in the Console first, since compile errors stop everything), or the Graphics setting points at a deleted or corrupt pipeline asset. Create a fresh one with Assets > Create > Rendering > URP Asset (with Universal Renderer) and assign it in Graphics and Quality settings.
Pink after upgrading the Unity version
Upgrading Unity also upgrades URP/HDRP and Shader Graph. Custom HLSL shaders that include internal URP files can break between versions. Check the Console for shader errors, re-open and save Shader Graphs, and update any Asset Store shader packs to their Unity 6 versions. Our Unity version compatibility checker helps you pick an LTS version that your assets support before you upgrade.
Pink particles only
Particle systems created in a Built-in project use Particles/Standard Unlit or legacy particle shaders. In URP, assign Universal Render Pipeline/Particles/Unlit (or Lit) to the particle material. In HDRP, use a particle Shader Graph or switch the effect to the VFX Graph.
FAQ
Why is everything pink in Unity?
Your materials use shaders written for a different render pipeline than the one your project uses, most often Built-in Standard materials in a URP project. Convert them with Window > Rendering > Render Pipeline Converter (Built-in to URP, Material Upgrade).
How do I fix pink materials in URP?
Back up the project, open the Render Pipeline Converter, choose Built-in to URP, tick Material Upgrade (and Read-only Material Converter for model materials), click Initialize Converters, then Convert Assets. Custom shaders need to be replaced or ported manually.
Can I convert URP materials back to Built-in?
There’s no automatic converter in that direction. You’d reassign each material to Standard and re-link its textures. That’s another reason to back up before converting.
Why are my materials pink only in the build?
Usually a quality level without a pipeline asset, a shader that’s only loaded through Shader.Find and got stripped, or a shader that doesn’t support the target graphics API. Check the player log for “Shader Unsupported” warnings.
Should I use URP or HDRP in Unity 6?
For almost all indie and mobile/web projects, URP. It runs on every platform, gets Unity’s new rendering features first, and is the default for new projects. HDRP targets high-end PC and consoles and was moved to maintenance mode in 2026.
Is the Built-in Render Pipeline going away?
Unity started deprecating it in Unity 6.5. It still works and is still included in current LTS releases, so existing projects aren’t forced to move right now, but new projects and new assets should use URP.
Reader questions
Asked by readers of this article and answered by AI. Behavior can differ between Unity versions, so test in yours.



Leave a Reply