

Every Unity project with a walking character hits the same fork in the road on day one: use the built-in CharacterController component, or put a Rigidbody on the player and move it with physics? Both work, both are used in shipped games, and picking the wrong one means fighting the engine for the rest of the project. This guide explains how each one actually moves, gives you a clear way to choose, and then builds a complete, working controller with each approach in Unity 6, including jumping, gravity, slopes and the bugs that show up in the first week.
The Core Difference
A CharacterController is a capsule that you move. You call Move() with how far to go this frame, and it slides along walls, climbs steps and stops at obstacles. It is not a physics body: gravity, forces and momentum don’t exist unless you write them. That makes it predictable and precise.
A Rigidbody is moved by the physics engine. You give it velocity or forces, and PhysX integrates them along with gravity, friction, collisions and every other body in the scene. That makes it interact naturally with the world, but you’re steering a simulation rather than placing a character.
In short: CharacterController is kinematic movement with collision. Rigidbody is simulated movement.
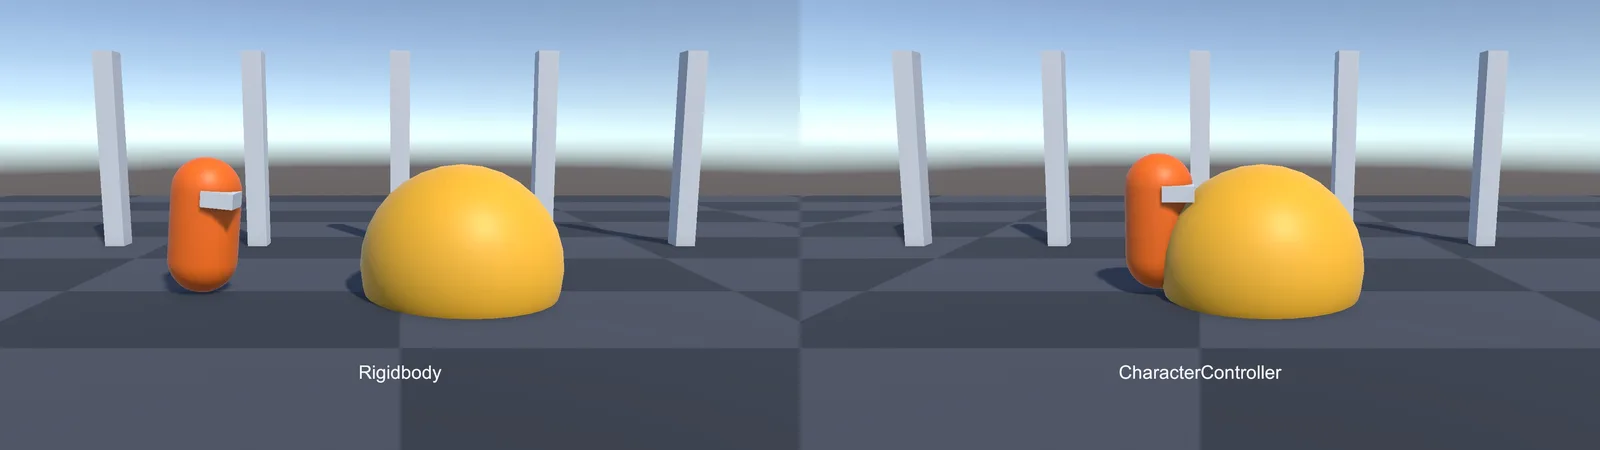
Side-by-Side Comparison
| Feature | CharacterController | Rigidbody |
|---|---|---|
| Gravity | You write it | Built in |
| Steps and stairs | Built in (Step Offset) | You handle it (ramps, step-up code) |
| Slopes | Slope Limit, stops cleanly | Slides down unless you counter it |
| Pushed by explosions, moving objects | No (you fake it) | Yes, naturally |
| Pushes other Rigidbodies | Only via OnControllerColliderHit | Yes, naturally |
| Moving platforms | You add platform velocity | Friction helps, still needs work |
| Responsiveness | Instant, snappy | Can feel floaty without tuning |
| Where to move it | Update | FixedUpdate |
| Collision shape | Upright capsule only | Any collider |
| Best fit | FPS, third-person action, platformers with tight control | Physics games, ragdolls, vehicles, rolling balls, sandbox |
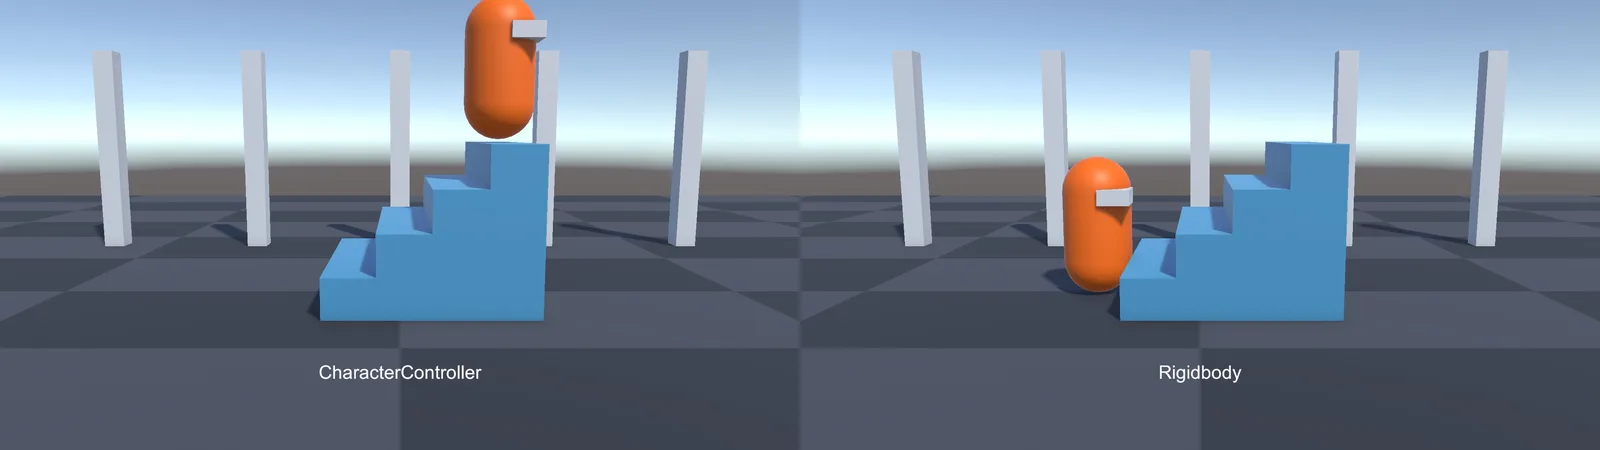
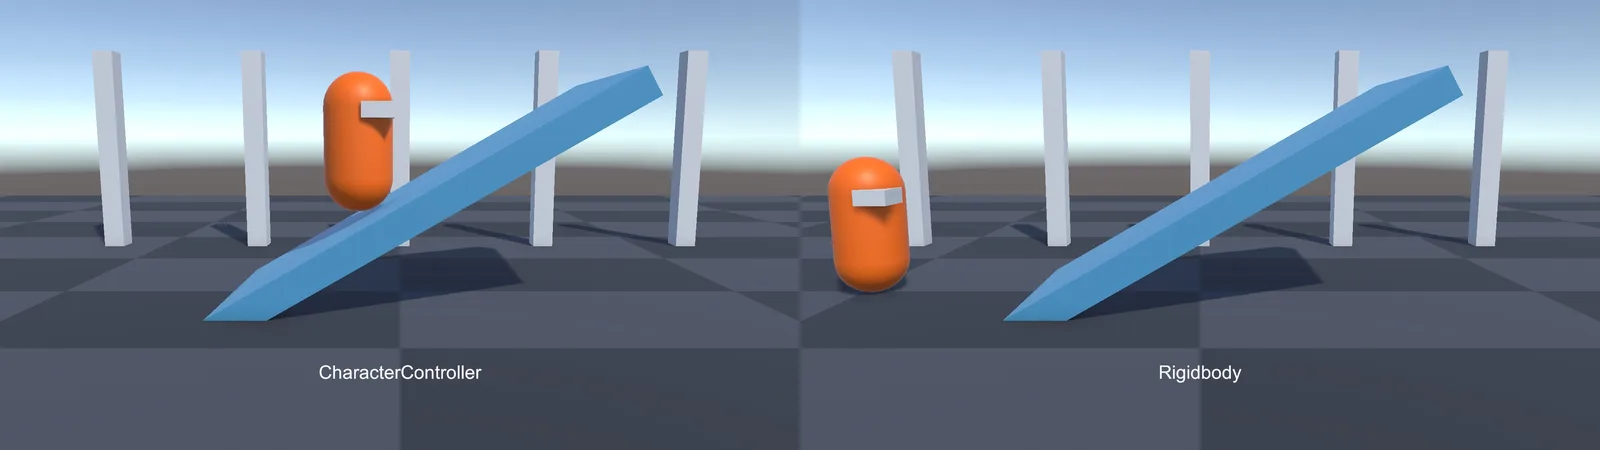
Which One Should You Use?
A practical rule of thumb:
- Use CharacterController if the player is a person who walks, runs and jumps, and you want the controls to feel exact. Most first-person and third-person games fall here. You’ll write a little gravity code, and in return you never fight sliding, bouncing or jitter.
- Use Rigidbody if physics is the gameplay: the player gets knocked around, rides physics vehicles, swings on ropes, is a ball or a ragdoll, or must push and stack crates realistically.
- Use neither for top-down or grid games that only need trigger checks. A kinematic Rigidbody moved with
MovePosition, or plain transform movement with overlap checks, is simpler.
Don’t put both on the same object. A CharacterController plus a non-kinematic Rigidbody fight each other every frame and produce the jitter and teleporting that fill forum threads.
Build a CharacterController Player
Add a CharacterController to your player (it replaces the Capsule Collider; remove that). Set Height 2, Radius 0.5, Center Y 1 if the pivot is at the feet, Step Offset 0.3, Slope Limit 45, and Skin Width around 10% of the radius (0.05).
This script uses the Input System with a PlayerInput-free approach (input actions referenced directly) so it works in a fresh Unity 6 project:
using UnityEngine;
using UnityEngine.InputSystem;

[RequireComponent(typeof(CharacterController))]
public class CCPlayer : MonoBehaviour
{
    [SerializeField] InputActionReference move;
    [SerializeField] InputActionReference jump;
    [SerializeField] float speed = 6f;
    [SerializeField] float jumpHeight = 1.2f;
    [SerializeField] float gravity = -20f;

    CharacterController cc;
    Vector3 velocity; // only Y is used for gravity and jumping

    void Awake() => cc = GetComponent<CharacterController>();
    void OnEnable() { move.action.Enable(); jump.action.Enable(); }
    void OnDisable() { move.action.Disable(); jump.action.Disable(); }

    void Update()
    {
        bool grounded = cc.isGrounded;
        if (grounded && velocity.y < 0f)
            velocity.y = -2f; // keep a little downward push so isGrounded stays true

        Vector2 input = move.action.ReadValue<Vector2>();
        Vector3 horizontal = (transform.right * input.x + transform.forward * input.y) * speed;

        if (grounded && jump.action.WasPressedThisFrame())
            velocity.y = Mathf.Sqrt(jumpHeight * -2f * gravity);

        velocity.y += gravity * Time.deltaTime;

        // one Move call per frame: horizontal + vertical together
        cc.Move((horizontal + velocity) * Time.deltaTime);
    }
}
Three details make this work:
- One
Movecall per frame.isGroundedreports the result of the lastMove. CallingMovetwice (once for horizontal, once for gravity) makes it flicker between true and false. - The small -2 downward velocity on the ground keeps the capsule pressed into the floor, so
isGroundeddoesn’t drop out on bumps and downhill slopes. - The jump formula
sqrt(h * -2 * g)gives the exact launch speed to reachjumpHeightmetres, so you tune in metres rather than magic numbers.
Don’t call SimpleMove in the same script. It applies its own gravity, ignores the Y component you pass and makes jumping impossible. It’s only useful for the simplest NPC wandering.
Build a Rigidbody Player
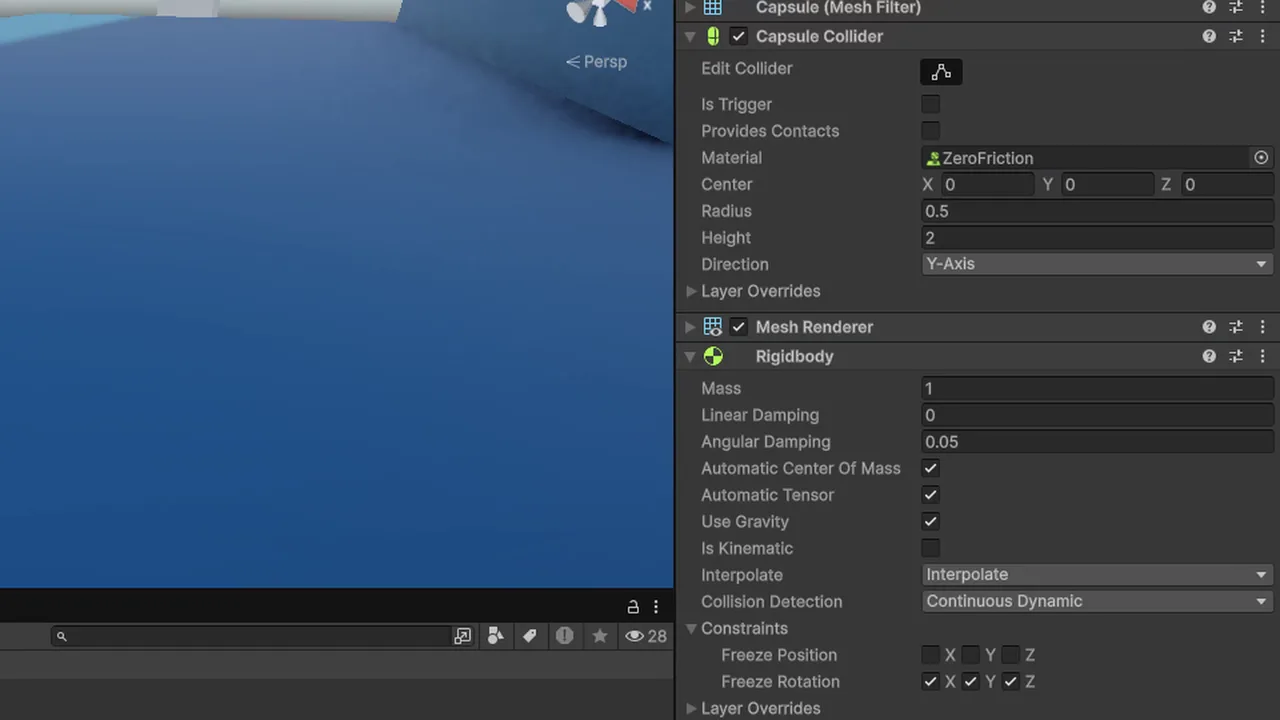
Add a Rigidbody and a Capsule Collider. On the Rigidbody, set Interpolate to Interpolate, Collision Detection to Continuous (or Continuous Dynamic for fast players), and under Constraints freeze rotation X, Y and Z so the capsule doesn’t tip over. Create a Physics Material with Dynamic and Static Friction 0 and Friction Combine Minimum, and put it on the collider so the player doesn’t stick to walls.
using UnityEngine;
using UnityEngine.InputSystem;

[RequireComponent(typeof(Rigidbody))]
public class RBPlayer : MonoBehaviour
{
    [SerializeField] InputActionReference move;
    [SerializeField] InputActionReference jump;
    [SerializeField] float speed = 6f;
    [SerializeField] float acceleration = 50f;
    [SerializeField] float jumpHeight = 1.2f;
    [SerializeField] LayerMask groundMask;

    Rigidbody rb;
    Vector2 input;
    bool jumpQueued;

    void Awake() => rb = GetComponent<Rigidbody>();
    void OnEnable() { move.action.Enable(); jump.action.Enable(); }
    void OnDisable() { move.action.Disable(); jump.action.Disable(); }

    void Update()
    {
        // read input every frame so no presses are missed
        input = move.action.ReadValue<Vector2>();
        if (jump.action.WasPressedThisFrame()) jumpQueued = true;
    }

    void FixedUpdate()
    {
        bool grounded = Physics.SphereCast(rb.position + Vector3.up * 0.5f, 0.45f,
                                           Vector3.down, out _, 0.1f, groundMask,
                                           QueryTriggerInteraction.Ignore);

        Vector3 target = (transform.right * input.x + transform.forward * input.y) * speed;
        Vector3 current = rb.linearVelocity;
        Vector3 change = new Vector3(target.x - current.x, 0f, target.z - current.z);
        change = Vector3.ClampMagnitude(change, acceleration * Time.fixedDeltaTime);
        rb.AddForce(change, ForceMode.VelocityChange);

        if (jumpQueued && grounded)
        {
            float jumpSpeed = Mathf.Sqrt(jumpHeight * -2f * Physics.gravity.y);
            rb.linearVelocity = new Vector3(rb.linearVelocity.x, jumpSpeed, rb.linearVelocity.z);
        }
        jumpQueued = false;
    }
}
Notes on this version:
- In Unity 6,
Rigidbody.velocitywas renamed tolinearVelocity(anddragtolinearDamping). Old tutorials still usevelocity, which now gives an obsolete warning. - Input is read in
Updateand applied inFixedUpdate. ReadingWasPressedThisFrameinsideFixedUpdatemisses presses, because FixedUpdate doesn’t run every frame. - Steering velocity toward a target with a capped
VelocityChangegives snappy control while still letting explosions and collisions push the player, unlike settinglinearVelocitydirectly every step. - The ground check is a short
SphereCast, which is more forgiving on edges than a single ray. Our raycast guide explains masks and shape casts in detail.
If the camera follows this player and the image stutters, it’s almost always interpolation or the camera updating at the wrong time. See jittery Rigidbody movement for the full fix.
Camera-Relative Movement
Both scripts move relative to the player’s own facing (transform.forward), which suits first-person. For third-person, “up” on the stick should mean “away from the camera”. Flatten the camera’s vectors onto the ground plane:
Vector3 camForward = Vector3.ProjectOnPlane(cam.transform.forward, Vector3.up).normalized;
Vector3 camRight = Vector3.ProjectOnPlane(cam.transform.right, Vector3.up).normalized;
Vector3 moveDir = camRight * input.x + camForward * input.y;

if (moveDir.sqrMagnitude > 0.01f)
    transform.rotation = Quaternion.Slerp(transform.rotation,
        Quaternion.LookRotation(moveDir), 12f * Time.deltaTime);
Use moveDir * speed in place of the transform.right/forward line. This pairs well with a Cinemachine orbit camera; our Cinemachine 3 third-person camera guide sets one up.
📚 Want to understand game feel properly?
Acceleration curves, coyote time and jump buffering are covered brilliantly in a couple of the game design books on our list.
Pushing Objects and Being Pushed
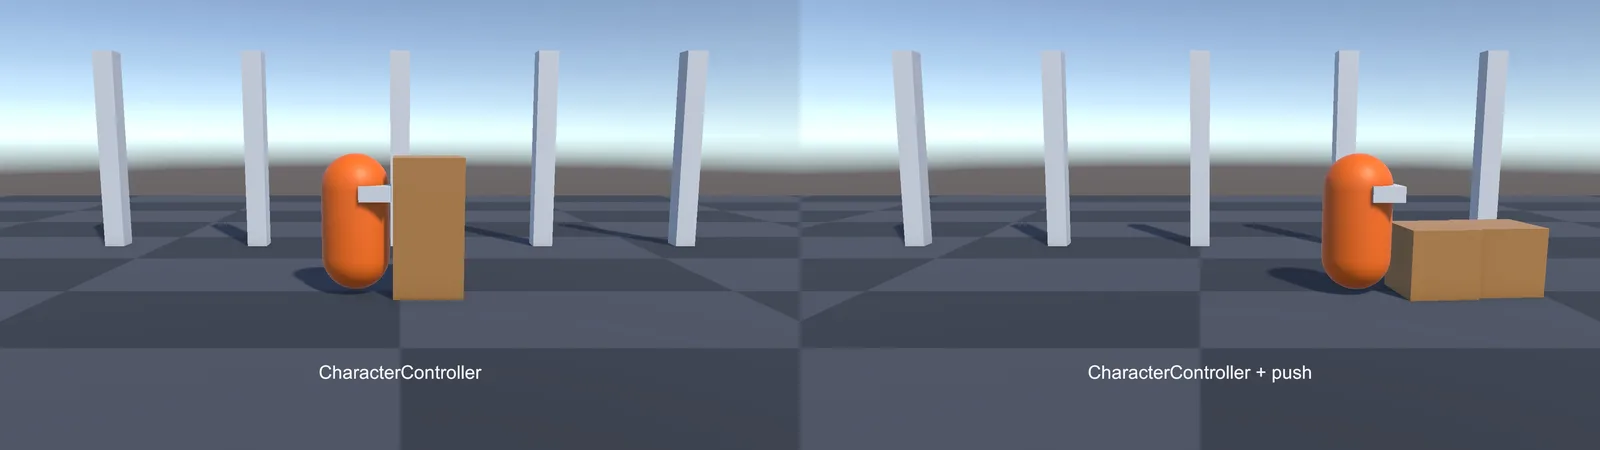
A CharacterController walks into Rigidbody crates and simply stops, because it isn’t part of the simulation. Push them yourself in OnControllerColliderHit:
[SerializeField] float pushPower = 2f;

void OnControllerColliderHit(ControllerColliderHit hit)
{
    Rigidbody body = hit.collider.attachedRigidbody;
    if (body == null || body.isKinematic) return;
    if (hit.moveDirection.y < -0.3f) return; // don't push things we're standing on

    Vector3 push = new Vector3(hit.moveDirection.x, 0f, hit.moveDirection.z);
    body.linearVelocity = push * pushPower;
}
Being pushed (knockback, explosions, wind) is the reverse: add an externalVelocity vector to the controller, include it in Move, and decay it toward zero each frame. With a Rigidbody player, AddForce or AddExplosionForce just works, which is a big reason physics-heavy games pick Rigidbody.
Troubleshooting
CharacterController isGrounded keeps flickering
You’re calling Move more than once per frame, or you reset vertical velocity to exactly 0 on the ground. Combine movement into one Move call and keep a small negative Y velocity (around -2) while grounded.
CharacterController falls through the floor or teleports
Something else is setting transform.position (an Animator with Apply Root Motion, a respawn script, a parent). Setting the position directly while a CharacterController is enabled gets overwritten. Disable the controller, set the position, then re-enable it.
The player gets stuck on the edges of steps or walls
For CharacterController, raise Step Offset slightly and make sure Skin Width isn’t tiny. For Rigidbody, add the zero-friction Physics Material described above.
Rigidbody player slides down slopes
Gravity pulls it along the slope. When grounded and not giving input, set the horizontal velocity to zero, or project movement onto the ground normal and temporarily disable gravity (rb.useGravity = false) while standing on a walkable slope.
Rigidbody player bounces when landing or hitting walls
The collider’s Physics Material has bounciness above 0, or the player hits walls at high speed with Discrete collision. Set Bounciness to 0 and Collision Detection to Continuous.
Rigidbody player tips over or spins
Rotation constraints aren’t frozen. Freeze rotation X, Y and Z on the Rigidbody, then rotate the player yourself with rb.MoveRotation.
FAQ
Is CharacterController better than Rigidbody?
Neither is better overall. CharacterController gives tight, predictable control for walking characters. Rigidbody gives natural physical interaction. Pick based on whether physics is part of your gameplay.
Can I use CharacterController and Rigidbody together?
Not on the same object with a non-kinematic Rigidbody; they conflict. A kinematic Rigidbody alongside a CharacterController is allowed and only helps if you need trigger callbacks with certain setups.
Does CharacterController use gravity?
Only SimpleMove applies gravity. With Move you add gravity yourself by accumulating a vertical velocity each frame, as in the script above.
Why use FixedUpdate for Rigidbody movement?
Physics runs on a fixed timestep. Applying forces in FixedUpdate keeps movement consistent at any frame rate. Read input in Update and apply it in FixedUpdate.
Does a CharacterController trigger OnTriggerEnter?
Yes. A CharacterController counts as a collider for trigger events, so trigger zones work without adding a Rigidbody to the player.
What did Unity 6 change for Rigidbody movement?
The velocity and drag properties were renamed to linearVelocity and linearDamping (angularDrag became angularDamping). Behaviour is the same; old names show obsolete warnings.
Reader questions
Asked by readers of this article and answered by AI. Behavior can differ between Unity versions, so test in yours.



Leave a Reply