
The model looked great in Blender. In Unity it’s flat white, plain grey, or bright pink. The mesh made it across but the look didn’t. Blender textures missing in Unity is a three-part problem: the image files have to travel with (or next to) the FBX, Unity has to match them to the right material slots, and the material has to use a shader your render pipeline understands. This guide walks through all three for Blender 4.2 to 4.5 and Unity 6 with URP, including what Blender node setups simply can’t survive the trip.
What White, Grey and Pink Each Mean
The colour tells you which part failed:
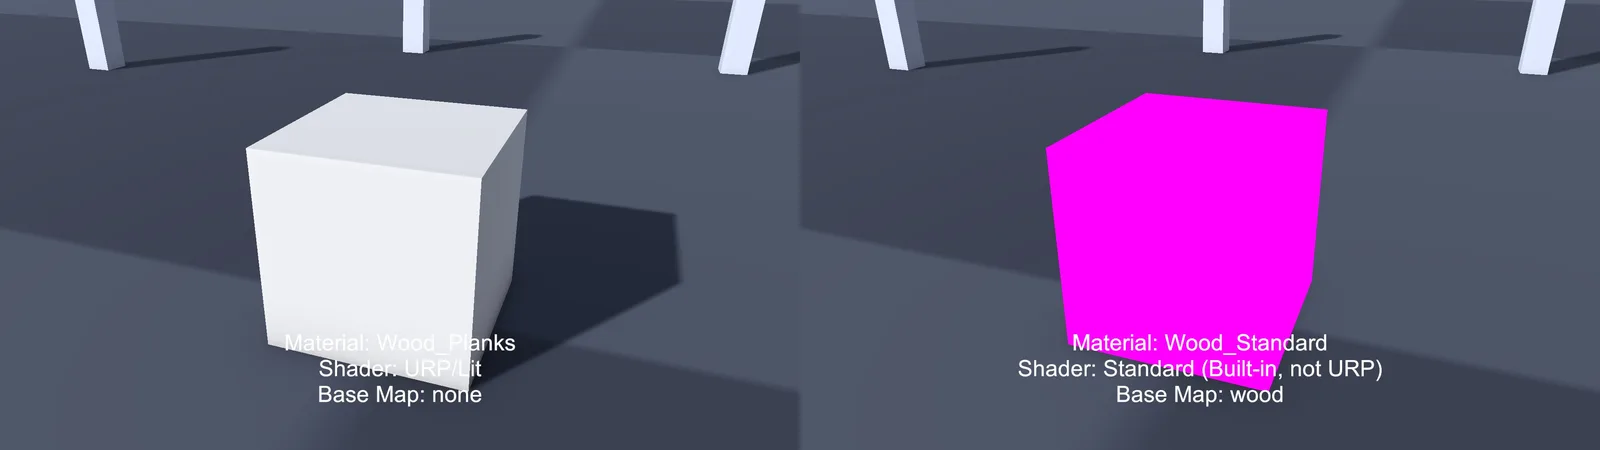
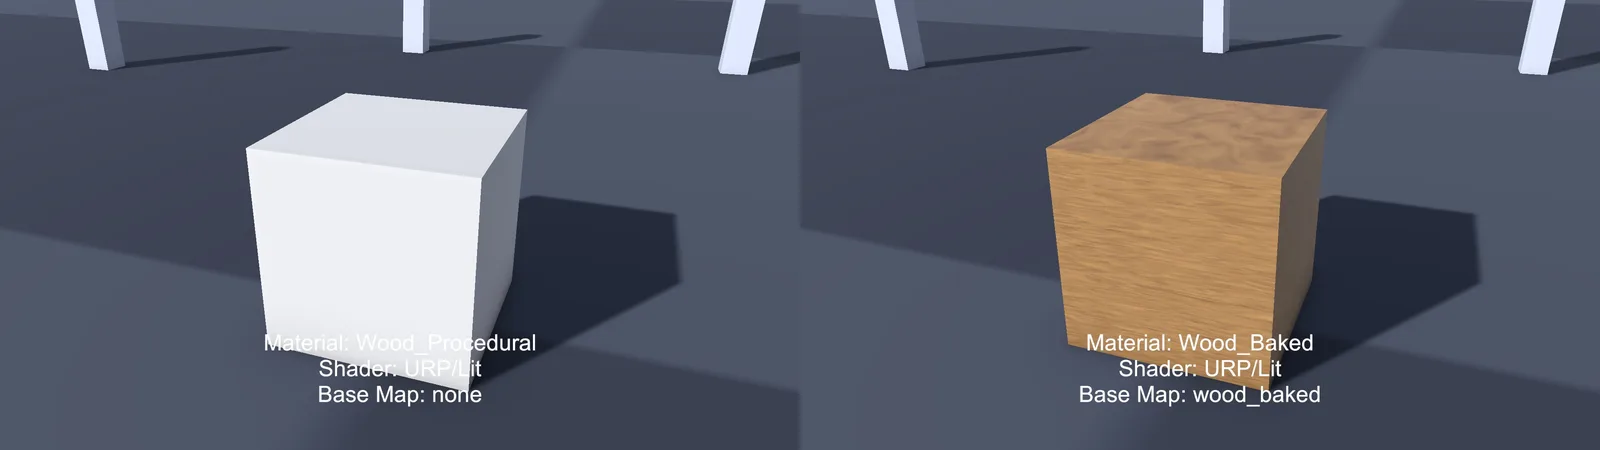
- White or light grey: the material exists and uses a working shader, but no texture is assigned. Unity didn’t find the image, or the Blender material had no image texture it could export.
- Solid colour that matches part of the texture: the texture is assigned but the mesh has no UV map, or all UVs sit in one spot.
- Magenta/pink: the shader is missing or isn’t compatible with your render pipeline. This is a shader problem, not a texture problem. Our pink materials guide covers the general fix.
- Pink in Blender too: Blender draws missing image files in magenta. The texture is lost before you even export. Use File > External Data > Find Missing Files to relink it.
What Actually Transfers From Blender
FBX is an old format with a simple material model. Blender’s exporter writes basic material values and the image files that feed them. It can’t export node logic. What generally survives:
- An Image Texture node plugged straight into the Principled BSDF’s Base Color.
- An Image Texture going through a Normal Map node into Normal.
- Simple values like base colour, metallic and alpha.
- Image textures on some other inputs, such as Emission or Alpha, wired directly.
What gets lost:
- Procedural textures: Noise, Voronoi, Wave, Gradient and so on.
- Anything between the image and the shader: Mix nodes, Color Ramp, Hue/Saturation, Math nodes.
- Multiple shaders mixed together, node groups, and Geometry Nodes materials.
- Vertex colours driving the material (the data exports, but URP Lit doesn’t display it).
So the rule for game assets is: one Principled BSDF per material, with image textures plugged directly into it. If your material is more complex, bake it to images first (see baking).
Embed Textures in the FBX
By default the FBX stores only paths to your images, and those paths point at your Blender folder, which Unity can’t see. The simplest fix is to pack the images into the FBX:
- Make sure every texture is a real file on disk (no missing files in Blender).
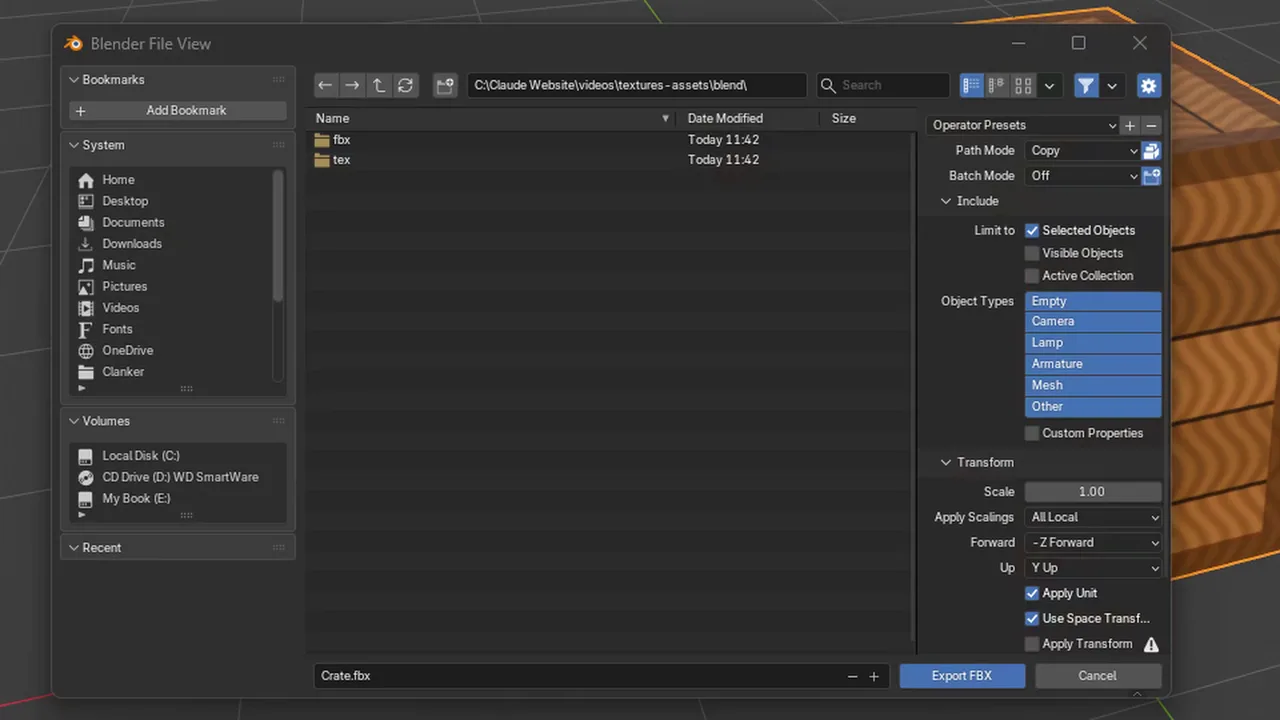
- Open File > Export > FBX (.fbx).
- Near the top of the export sidebar, set Path Mode to Copy.
- Click the small Embed Textures toggle button next to it so it’s highlighted.
- Export into your Unity project’s Assets folder.
In a script, that’s path_mode='COPY' and embed_textures=True on bpy.ops.export_scene.fbx. The rest of the export settings, for scale and rotation, are in our Blender to Unity FBX export settings guide.
The alternative is to not embed, and copy the texture files into the Unity project yourself, usually into a Textures folder next to the model. Unity searches for textures by file name, including in a Textures folder beside the model. This keeps the FBX small and lets you edit images without re-exporting. Embedding is easier for beginners. Separate files are cleaner for larger projects. Either works.
Extract Textures and Extract Materials in Unity
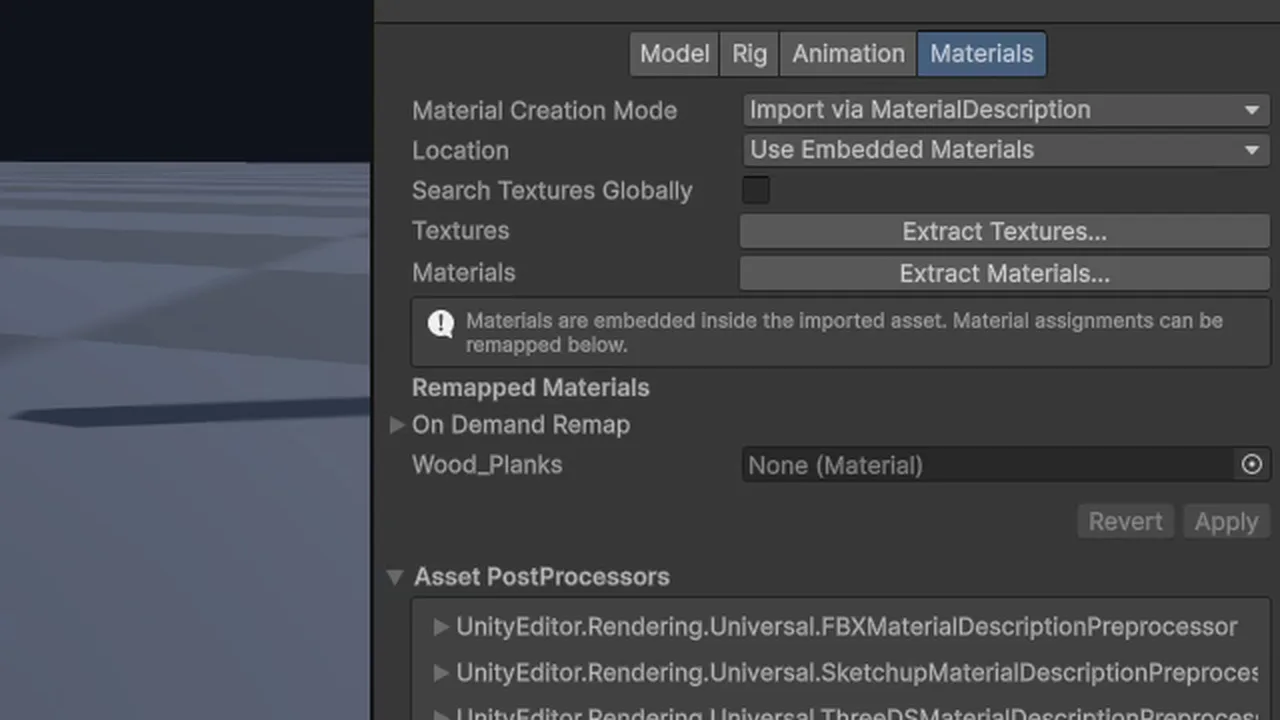
Select the FBX in the Project window and open the Materials tab in the Inspector. The key settings:
- Material Creation Mode: Import via MaterialDescription (the default) builds materials from the FBX data. In a URP project, URP converts them to its Lit shader. None imports no materials and uses the default material.
- Location: Use Embedded Materials (the default) keeps the materials inside the FBX asset. Use External Materials (Legacy) is the old behaviour that writes a Materials folder; avoid it in new projects.
Embedded materials and textures are read-only. You can see them under the FBX in the Project window, but the Inspector is greyed out. Two buttons fix that:
- Extract Textures… copies embedded images out of the FBX into a folder you choose. After this, Unity reimports and links the materials to the extracted files. Do this first.
- Extract Materials… copies the materials out as normal, editable .mat files and remaps the model to use them.
After extracting, you can delete the embedded textures from the FBX on the next export by turning Embed Textures off, since Unity now uses the extracted copies. Keep an eye on the texture import settings: Unity treats new images as colour textures by default, which matters for normal and mask maps (see maps).
Remap to Your Own URP Materials
For a real project, you often want the model to use materials you built in Unity, not the ones generated from Blender. That way you control the shader, share materials between models and keep draw calls down. The Remapped Materials section of the Materials tab lists each material name from the FBX with an object field next to it.
- Manual: drag a Unity material into the slot for each Blender material name. Click Apply.
- Automatic: under On Demand Remap, choose a Naming rule (by material name is the useful one) and a Search scope, then click Search and Remap…. Unity finds project materials whose names match the Blender material names.
This is why naming materials in Blender matters. Call the Blender material “Wood_Planks” and create a Unity material with the same name, and every re-export maps itself. Leave it as “Material.002” and you’ll be remapping by hand forever.
Remapped materials survive re-exports from Blender as long as the material name stays the same. Rename it in Blender and the slot goes back to the generated material.
💻 Baking textures takes forever?
Cycles bakes lean hard on your GPU and RAM, and doing it next to an open Unity editor is worse. Our budget laptop picks focus on machines that handle both without crawling.
Bake Procedural Materials to Images
If your Blender material uses procedural nodes, Color Ramps or mixes, bake the result into image textures before export:
- Make sure the mesh has a clean UV map (UV > Smart UV Project is fine for props).
- Switch the render engine to Cycles in Render Properties. Baking only works in Cycles.
- In the material’s node editor, add an Image Texture node, click New, and create an image (1024 or 2048 square). Leave it unconnected but selected as the active node. The bake writes into the active image node.
- In Render Properties > Bake, set Bake Type to Diffuse, and under Contributions untick Direct and Indirect so only Color is baked. Otherwise lighting gets burned into the texture.
- Click Bake. When it finishes, open the image in the Image Editor and use Image > Save As to save it as a PNG.
- Rebuild the material: connect the baked image directly to Base Color and remove the procedural nodes (or keep a copy of the original material for later edits).
Repeat with Bake Type Roughness and Normal if those were procedural too. Then export as usual. If you have several objects that share a look, baking them into one atlas lets them share one material, which helps draw calls and batching.
Normal, Roughness and Metallic Maps in URP
Getting the base colour across is half the job. The other maps need a little care.
Normal maps
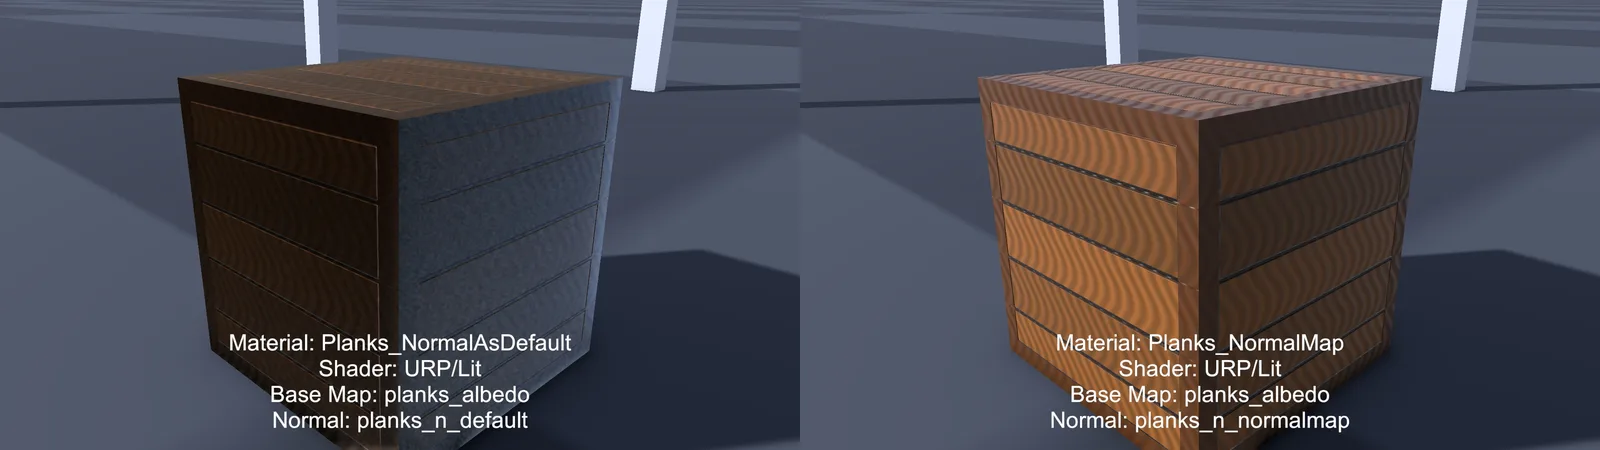
Blender and Unity both use OpenGL-style (Y+) normal maps, so no channel flipping is needed. In Unity, select the texture and set Texture Type to Normal map. If you forget, the URP Lit material inspector shows “This texture is not marked as a normal map” with a Fix Now button. Click it.
Roughness
Blender uses roughness. URP Lit uses smoothness, which is the inverse (smoothness = 1 – roughness). URP Lit has no roughness map slot. It reads smoothness from the alpha channel of the Metallic Map (or the Base Map, depending on Smoothness Source). So a Blender roughness map won’t show up as-is. Invert it and pack it into the alpha of your metallic map in an image editor, or use a single Smoothness value for simple props.
Metallic and other masks
Data textures (metallic, roughness, ambient occlusion, masks) should not be colour-corrected. Select each one in Unity and untick sRGB (Color Texture). Leave sRGB on for base colour and emission.
Alpha and transparency
If your Blender material uses alpha (leaves, fences), set the URP Lit material’s Surface Type to Transparent, or keep it Opaque and tick Alpha Clipping for cut-out foliage. Alpha Clipping is cheaper and sorts correctly.
If you need a quick check of which material and textures an object really ends up using at runtime, this logs it:
using UnityEngine;

public class MaterialReport : MonoBehaviour
{
    void Start()
    {
        foreach (Renderer r in GetComponentsInChildren<Renderer>())
        {
            foreach (Material m in r.sharedMaterials)
            {
                if (m == null) { Debug.LogWarning($"{r.name}: empty material slot", r); continue; }
                Texture baseMap = m.HasProperty("_BaseMap") ? m.GetTexture("_BaseMap") : null;
                Debug.Log($"{r.name}: {m.name} ({m.shader.name}), Base Map: {(baseMap ? baseMap.name : "none")}", r);
            }
        }
    }
}
_BaseMap is the base colour property on URP Lit. A “none” here means the texture link failed, not the shader.
Troubleshooting
Model is white after import
Textures weren’t embedded or found. Export with Path Mode Copy and Embed Textures on, or copy the images into a Textures folder next to the FBX and reimport.
Material settings are greyed out
Embedded materials are read-only. Use Extract Materials… in the Materials tab, or remap the slot to a material you created.
Model is pink
The material uses a shader your pipeline doesn’t support, usually a Built-in Standard material extracted from an older asset. Switch it to Universal Render Pipeline/Lit, or run Window > Rendering > Render Pipeline Converter.
This texture is not marked as a normal map
Click Fix Now, or set the texture’s Texture Type to Normal map.
Texture looks stretched or a single colour
The mesh has no UV map or a bad one. Unwrap it in Blender and export again.
Textures look washed out
A data map is marked sRGB, or the base colour isn’t. Base colour sRGB on, data maps off.
FAQ
Why are my Blender textures not showing in Unity?
The FBX only stored file paths, so Unity couldn’t find the images. Embed them with Path Mode Copy and Embed Textures, or copy them into the project.
Do Blender shader nodes work in Unity?
No. Only image textures wired directly into a Principled BSDF transfer. Bake anything procedural to images.
Should I embed textures or copy them separately?
Embedding is easiest. Separate files keep the FBX small and let you edit images without re-exporting. Both work.
How do I use a Blender roughness map in URP?
Invert it to smoothness and pack it into the alpha channel of the metallic map. URP Lit has no roughness slot.
Why can’t I edit the imported material?
It’s embedded in the FBX. Extract Materials or remap it to your own material.
Reader questions
Asked by readers of this article and answered by AI. Behavior can differ between Unity versions, so test in yours.


Leave a Reply