

If you learned Unity pathfinding from an older tutorial, the Navigation window you’re looking for is gone. In Unity 6, NavMesh baking lives in the AI Navigation package and is component-based: you add a NavMesh Surface to the scene, bake it, and move characters with a NavMesh Agent. This tutorial walks through the whole setup from an empty scene to an enemy that chases the player, then covers obstacles, area costs, runtime baking and the errors everyone hits along the way.
Quick answer
To bake a NavMesh in Unity 6, install the AI Navigation package, add a NavMesh Surface component to a GameObject in your scene, and click Bake in its Inspector. The old Bake tab in the Navigation window is gone; Window > AI > Navigation now only holds agent and area settings. Then add a NavMesh Agent to your character and call agent.SetDestination(target.position).
What Changed in Unity 6
For years, Unity’s pathfinding was set up through a built-in Navigation window: you marked objects as “Navigation Static” and pressed Bake. That workflow is legacy now. The current system, the AI Navigation package (version 2.x in Unity 6), works with components instead:
- NavMesh Surface defines what gets baked and stores the result as an asset.
- NavMesh Modifier and NavMesh Modifier Volume change how specific objects or regions are baked.
- NavMesh Link connects separate pieces of NavMesh, for gaps, ledges and ladders.
- NavMesh Agent and NavMesh Obstacle are unchanged and still live in the
UnityEngine.AInamespace.
The component approach is better in practice. You can have several surfaces for different agent sizes, bake prefabs and procedural levels at runtime, and keep navigation data per scene or per object. If you open an old project that used the legacy bake, the package includes a Navigation Updater (under Window > AI) to convert it to NavMesh Surfaces.
Step 1: Install the AI Navigation Package
- Open Window > Package Manager.
- Select Unity Registry and search for AI Navigation.
- Click Install.
Many Unity 6 templates already include it. You can tell it’s installed when Add Component > Navigation lists NavMesh Surface, and Window > AI > Navigation opens a window with Agents and Areas tabs.
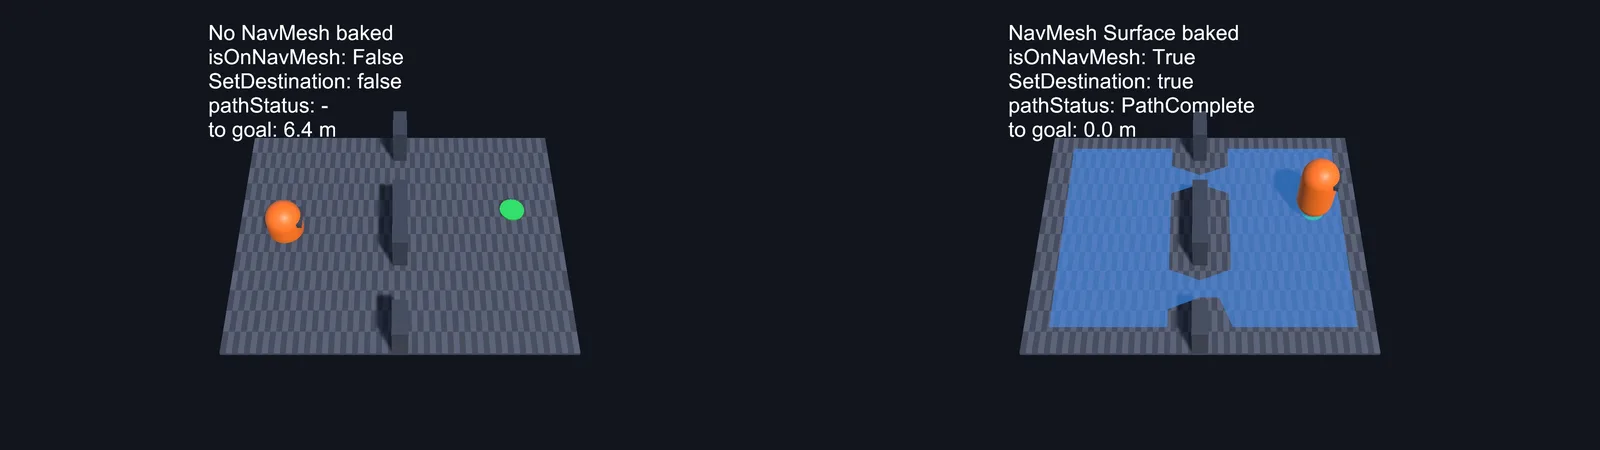
Step 2: Bake a NavMesh with NavMesh Surface
Build a test level first: a large plane or cube for the floor, a few cubes as walls, and maybe a ramp. Then:
- Create an empty GameObject and name it
Navigation. (You can also put the surface on the floor object itself, but a dedicated object keeps things tidy.) - Click Add Component > Navigation > NavMesh Surface.
- Leave Agent Type on Humanoid for now.
- Click Bake.
A blue overlay appears on every walkable area in the Scene view. That’s your NavMesh. The bake result is saved as an asset in a folder named after your scene, so it loads with the scene and costs nothing at runtime. Clear removes it. If you can’t see the blue overlay, open the AI Navigation overlay from the Scene view’s Overlay Menu; it’s hidden by default and has toggles for showing the NavMesh.
The NavMesh Surface settings that matter
- Collect Objects decides which objects are considered: All GameObjects, Volume (only inside a box you define), Current Object Hierarchy (only this object and its children) or NavMeshModifier Component Only. Current Object Hierarchy is great for making a prefab carry its own NavMesh.
- Include Layers filters by layer. Exclude layers such as characters, pickups and projectiles, or a player standing in the scene will punch a hole in the NavMesh.
- Use Geometry chooses between Render Meshes and Physics Colliders. Physics Colliders usually matches what characters can actually stand on and ignores decorative detail such as grass meshes.
Advanced NavMesh Surface settings
Expand Advanced at the bottom of the NavMesh Surface inspector when the default bake is close but not quite right:
- Generate Links (in the main settings) creates links automatically between the collected objects during the bake, so you don’t place every small drop by hand.
- Override Voxel Size: the bake samples the world in voxels, by default one third of the agent radius. If narrow doorways or thin walkways disappear from the NavMesh, a smaller voxel size usually brings them back, at the cost of a slower bake. Going finer than about eight voxels per agent radius rarely helps.
- Minimum Region Area throws away small disconnected patches. Raise it when blue islands appear on tabletops, roofs and crate lids that no agent can reach.
- Build Height Mesh stores extra height detail so agents stand at the correct height on stairs and bumpy ground instead of floating slightly above or sinking into it.
Agent types: radius, height, step and slope
Open Window > AI > Navigation and select the Agents tab. Each agent type has a Radius, Height, Step Height and Max Slope. The bake uses them to decide where that agent fits: the NavMesh is shrunk away from walls by the radius, low ceilings are excluded by the height, and stairs work only if each step is within Step Height. If a doorway isn’t walkable after baking, the agent radius is usually too big for it. Need both a small goblin and a large troll? Create two agent types and give each its own NavMesh Surface.
Step 3: Move a Character with NavMesh Agent
Create a capsule, place it on the blue area, and add Add Component > Navigation > NavMesh Agent. Its main settings are Speed, Angular Speed, Acceleration and Stopping Distance. Now tell it where to go. This script moves the agent to wherever you click:
using UnityEngine;
using UnityEngine.AI;
using UnityEngine.InputSystem;

[RequireComponent(typeof(NavMeshAgent))]
public class ClickToMove : MonoBehaviour
{
    NavMeshAgent agent;
    Camera cam;

    void Awake()
    {
        agent = GetComponent<NavMeshAgent>();
        cam = Camera.main;
    }

    void Update()
    {
        if (!Mouse.current.leftButton.wasPressedThisFrame) return;

        Ray ray = cam.ScreenPointToRay(Mouse.current.position.ReadValue());
        if (Physics.Raycast(ray, out RaycastHit hit))
        {
            agent.SetDestination(hit.point);
        }
    }
}
Press Play and click around. The agent plans a path around the walls and walks it. This uses the new Input System; if you’re not familiar with it, see our Input System beginner’s guide.
Checking when the agent has arrived
There’s no “arrived” event, so check the agent’s state. remainingDistance isn’t valid while the path is still being calculated, which is why pathPending comes first:
bool HasArrived(NavMeshAgent agent)
{
    return !agent.pathPending
        && agent.remainingDistance <= agent.stoppingDistance
        && (!agent.hasPath || agent.velocity.sqrMagnitude < 0.01f);
}
Example: An Enemy That Chases the Player
A classic first AI: the enemy stands still until the player comes within range, chases while they’re close, and returns home when they escape. The script doesn’t recalculate the path every frame, which keeps it cheap even with dozens of enemies:
using UnityEngine;
using UnityEngine.AI;

[RequireComponent(typeof(NavMeshAgent))]
public class ChaseEnemy : MonoBehaviour
{
    [SerializeField] Transform player;
    [SerializeField] float detectRange = 12f;
    [SerializeField] float giveUpRange = 20f;
    [SerializeField] float repathInterval = 0.25f;

    NavMeshAgent agent;
    Vector3 home;
    bool chasing;
    float nextRepath;

    void Awake()
    {
        agent = GetComponent<NavMeshAgent>();
        home = transform.position;
    }

    void Update()
    {
        float dist = Vector3.Distance(transform.position, player.position);

        if (!chasing && dist < detectRange) chasing = true;
        else if (chasing && dist > giveUpRange)
        {
            chasing = false;
            agent.SetDestination(home);
        }

        if (chasing && Time.time >= nextRepath)
        {
            agent.SetDestination(player.position);
            nextRepath = Time.time + repathInterval;
        }
    }
}
Give the enemy a Stopping Distance of about 1.5 so it stops in front of the player instead of pushing into them. From here you’d add an attack when HasArrived is true, or a patrol route by cycling through an array of waypoints when the enemy isn’t chasing.
🧭 Check your Unity version first
The component workflow here needs AI Navigation 2.x, which pairs with Unity 6. On an older editor, some menus and options differ. Our free checker shows which Unity versions support the packages and features you’re planning to use.
Obstacles, Modifiers and Links
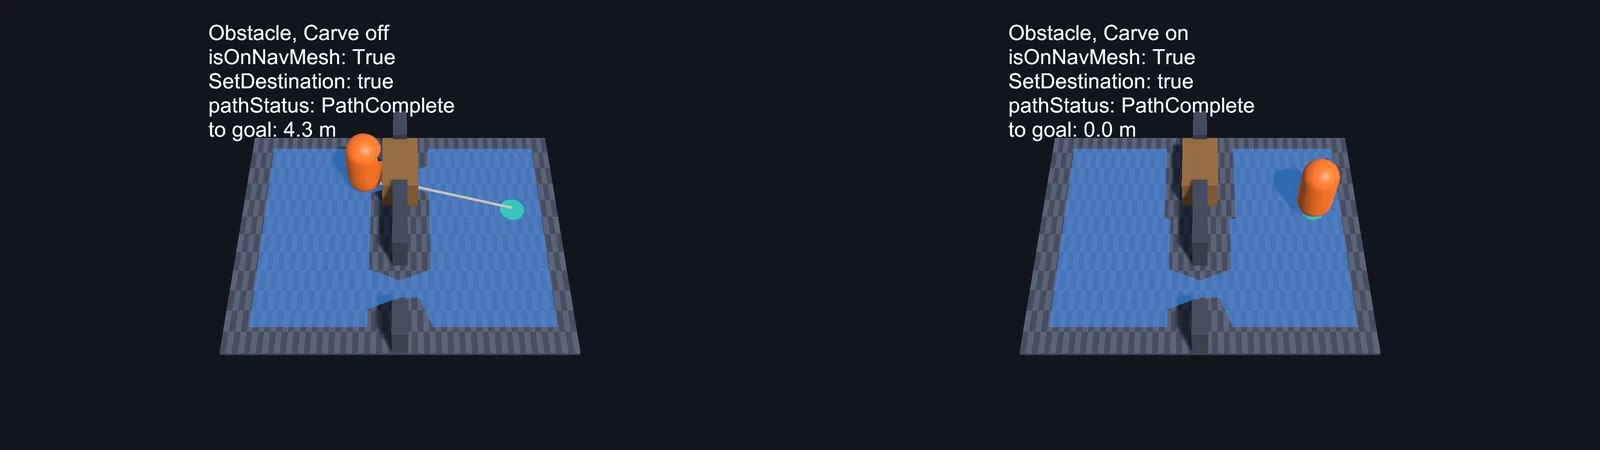
NavMesh Obstacle: things that move
A door, a crate that gets pushed or a parked car shouldn’t be baked into the NavMesh because it moves. Add Navigation > NavMesh Obstacle instead and tick Carve. A carving obstacle cuts a hole in the NavMesh at runtime so agents plan paths around it. Without Carve, agents only steer around it locally and keep trying to path through it. Enable Carve Only Stationary so the hole is only recalculated when the object stops moving.
Don’t put both a NavMesh Agent and a carving NavMesh Obstacle on the same object. The agent would sit inside its own hole.
NavMesh Modifier: change how one object bakes
Add NavMesh Modifier to an object to override its area type (for example, mark a lava plane as Not Walkable) or to leave it out of the bake entirely, which is handy for props that shouldn’t block paths. NavMesh Modifier Volume does the same for everything inside a box, such as a patch of swamp inside a larger floor. Rebake after adding either.
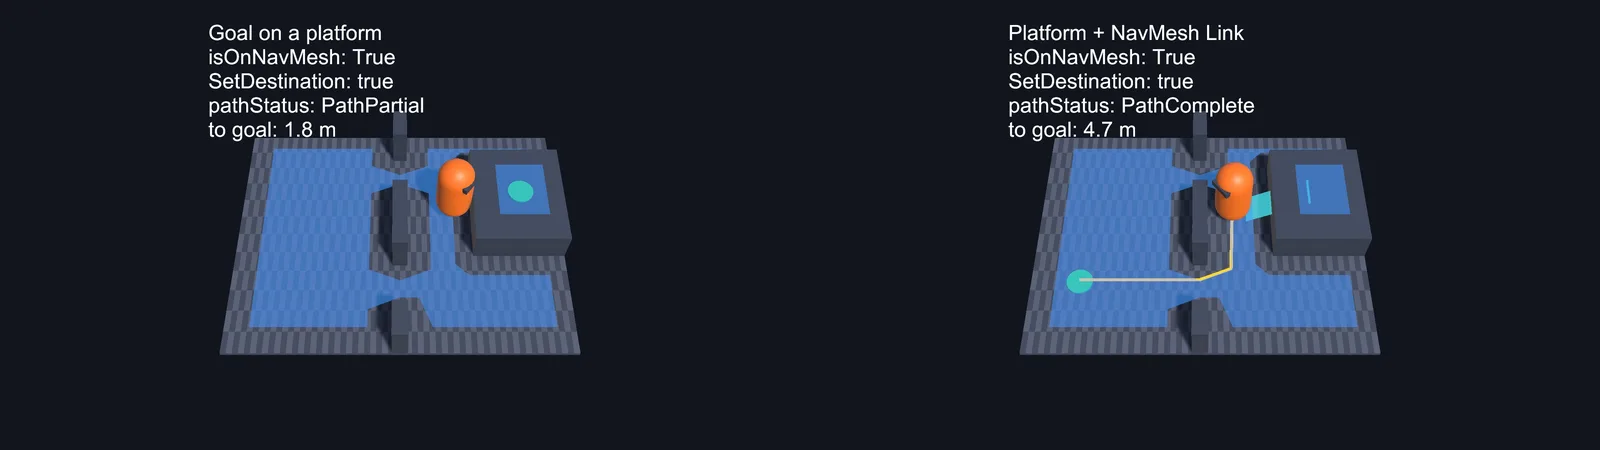
NavMesh Link: jumps, gaps and ladders
Two separate NavMesh areas, like a rooftop and the street below, aren’t connected unless you add a link. Add Navigation > NavMesh Link, move its start and end points onto each area, and set Width if it should be wider than a single point. Tick Bidirectional for two-way travel. By default the agent crosses a link by sliding along it; to play a jump or climb animation instead, turn off Auto Traverse Off Mesh Link on the agent and move it yourself while agent.isOnOffMeshLink is true, then call agent.CompleteOffMeshLink().
Area Types and Costs
Areas let agents prefer some ground over other ground. In Window > AI > Navigation, open the Areas tab and add an area such as Mud with a Cost of 5. Mark mud objects with a NavMesh Modifier set to that area and rebake. Paths now avoid mud unless the detour costs more than five times the distance. Two useful script calls:
int mud = NavMesh.GetAreaFromName("Mud");

// Make this particular agent hate mud even more
agent.SetAreaCost(mud, 20f);

// Or forbid it completely for this agent
agent.areaMask &= ~(1 << mud);
Baking at Runtime
Procedural levels, player-built bases and levels assembled from prefabs need a NavMesh built after the geometry exists. NavMesh Surface can bake from code. It lives in the Unity.AI.Navigation namespace:
using Unity.AI.Navigation;
using UnityEngine;

public class LevelNavBaker : MonoBehaviour
{
    [SerializeField] NavMeshSurface surface;

    // Call once the level has been generated
    public void BuildNow()
    {
        surface.BuildNavMesh();
    }

    // Call after small changes, spread over several frames
    public void UpdateAsync()
    {
        surface.UpdateNavMesh(surface.navMeshData);
    }
}
BuildNavMesh() is synchronous and can stall a frame on large levels, so call it during a loading screen. UpdateNavMesh() returns an AsyncOperation and runs in the background. For things that move often, a carving NavMesh Obstacle is cheaper than rebaking.
Making the Agent Animate
A NavMesh Agent moves the transform but knows nothing about your Animator, so a character with a walk cycle will slide along in its idle pose until you connect the two. The simplest setup that works for most games:
- In the Animator Controller, add a Float parameter called
Speedand a 1D blend tree (or Idle/Walk/Run transitions) driven by it. - Untick Apply Root Motion on the Animator, so the animation doesn’t fight the agent for control of the position.
- Feed the agent’s actual speed into the parameter every frame:
using UnityEngine;
using UnityEngine.AI;

public class AgentAnimator : MonoBehaviour
{
    [SerializeField] Animator animator;
    NavMeshAgent agent;
    static readonly int SpeedId = Animator.StringToHash("Speed");

    void Awake() => agent = GetComponent<NavMeshAgent>();

    void Update()
    {
        // velocity is what the agent is really doing, including braking
        animator.SetFloat(SpeedId, agent.velocity.magnitude, 0.1f, Time.deltaTime);
    }
}
The damping argument (0.1 seconds) stops the blend from snapping when the agent starts or stops. Use velocity rather than desiredVelocity for this: desiredVelocity is where the agent wants to go, so feet keep walking while it’s blocked by another agent. If the character still doesn’t animate, the problem is on the Animator side; our animation not playing guide covers those causes.
If you need root motion (feet that never slide), turn it the other way round: set agent.updatePosition = false, let the animation move the character in OnAnimatorMove, and keep the agent in sync by assigning agent.nextPosition = transform.position. It’s more work, so only switch when foot sliding is actually visible.
Seeing the Path the Agent Planned
When an agent misbehaves, the fastest diagnosis is to draw the path it computed. Add this to the agent and select it during Play mode:
void OnDrawGizmosSelected()
{
    if (agent == null || !agent.hasPath) return;
    Vector3[] corners = agent.path.corners;
    Gizmos.color = Color.yellow;
    for (int i = 0; i < corners.Length - 1; i++)
        Gizmos.DrawLine(corners[i], corners[i + 1]);
}
Read the result like this:
- No line at all: pathfinding failed. The agent or the destination isn’t on the NavMesh, or there’s no connection between them.
- A line that stops short: the path is partial (
agent.pathStatus == NavMeshPathStatus.PathPartial). The destination is on an island the agent can’t reach, so it walks to the closest point and stops. - A good line but no movement: pathfinding is fine; something else is holding the agent (Speed,
isStopped, root motion, a Rigidbody or another script).
You can also check before committing to a move. SetDestination returns false when it can’t even start a path request, and NavMesh.CalculatePath tells you whether a full route exists without moving anything:
var path = new NavMeshPath();
if (NavMesh.CalculatePath(transform.position, target, agent.areaMask, path)
    && path.status == NavMeshPathStatus.PathComplete)
{
    agent.SetPath(path);   // reuse the path we already computed
}
else
{
    Debug.LogWarning($"{name}: no complete path to {target}");
}
Troubleshooting
“SetDestination” can only be called on an active agent that has been placed on a NavMesh.
The most common NavMesh error. The agent isn’t standing on a NavMesh at the moment you call SetDestination. Check, in order:
- A NavMesh has actually been baked for this scene (blue overlay visible with the AI Navigation overlay on).
- The agent’s Agent Type matches the surface’s Agent Type. A “Humanoid” agent can’t use a NavMesh baked for a different type.
- The agent was spawned in the air or inside a wall. Snap it onto the mesh:
if (NavMesh.SamplePosition(spawnPos, out NavMeshHit hit, 2f, NavMesh.AllAreas))
{
    agent.Warp(hit.position);
}
Guard calls with if (agent.isOnNavMesh) when the agent might be disabled or mid-spawn. For runtime baking, the agent must be enabled after the bake finishes.
Failed to create agent because it is not close enough to the NavMesh
Same root cause, reported when the agent component is enabled. The object’s pivot is too far from any NavMesh. Move the object down onto the floor, check the pivot is at the character’s feet, or instantiate at a position from NavMesh.SamplePosition.
The bake produces no blue NavMesh
- The floor isn’t on an Include Layers layer, or Collect Objects excludes it (for example Current Object Hierarchy on an empty object with no children).
- Use Geometry is set to Physics Colliders but the floor has no collider.
- The floor is too small or too steep for the agent type’s radius and Max Slope.
- The NavMesh is there but hidden: turn on the AI Navigation overlay.
The agent doesn’t move at all
Check that Speed isn’t 0, that nothing else sets transform.position every frame (a Rigidbody or CharacterController fighting the agent is the usual one), and that the destination is reachable. agent.pathStatus returns PathPartial or PathInvalid when it isn’t. If an Animator uses root motion, it may be overriding the agent’s movement.
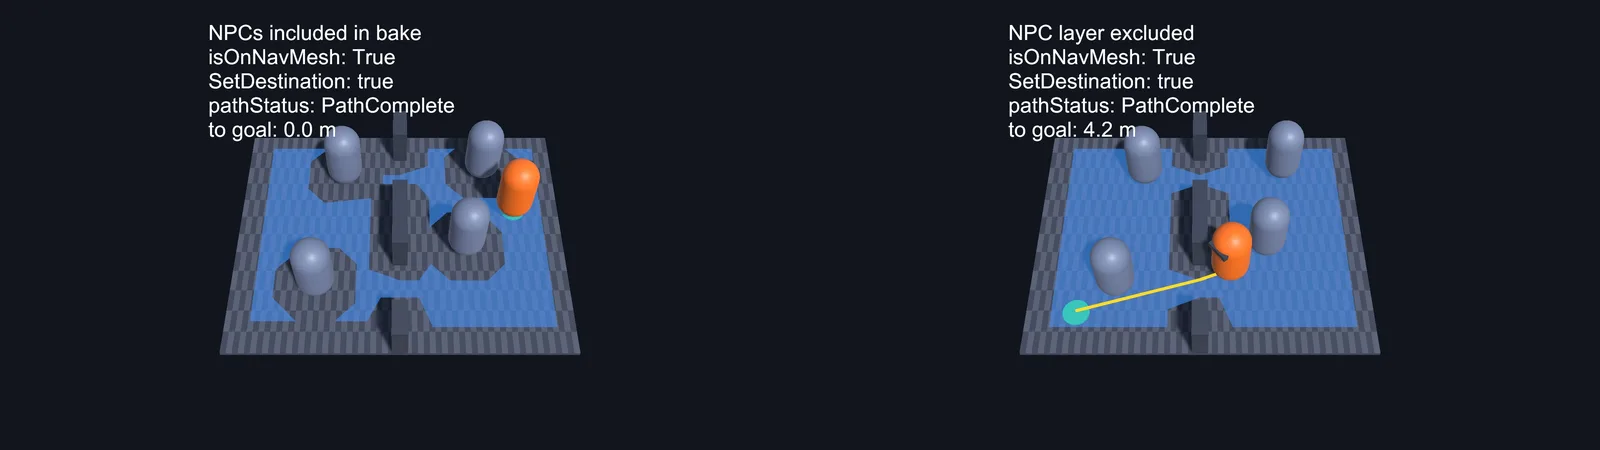
The NavMesh has holes where characters stood
Your characters were included in the bake. Put them on a layer that’s excluded from Include Layers, or add a NavMesh Modifier that removes them from the build, and bake again.
Agents jitter, orbit the destination or push each other
Raise Stopping Distance slightly and increase Acceleration so they brake in time. For crowds, set different Avoidance Priority values so agents yield to each other instead of deadlocking. Avoid calling SetDestination every frame, as the chase example above shows.
The agent worked, then stopped responding
Something switched it off. Search your scripts for isStopped = true, ResetPath() and agent.enabled = false; a stun, dialogue or pause script often sets one of them and never undoes it. A disabled agent also forgets its path, so call SetDestination again after re-enabling it. Watching isStopped and hasPath in the Inspector’s Debug mode while it happens usually points straight at the culprit.
The agent refuses to cross one part of the level
Check the agent’s Area Mask. If that ground was baked as an area the mask excludes (or as Not Walkable via a modifier), the agent treats it as a wall. Set the mask to Everything as a test; if the agent now crosses, fix the area or the mask. A very high area cost can look the same, since the agent takes a long detour or prefers to stop at the edge.
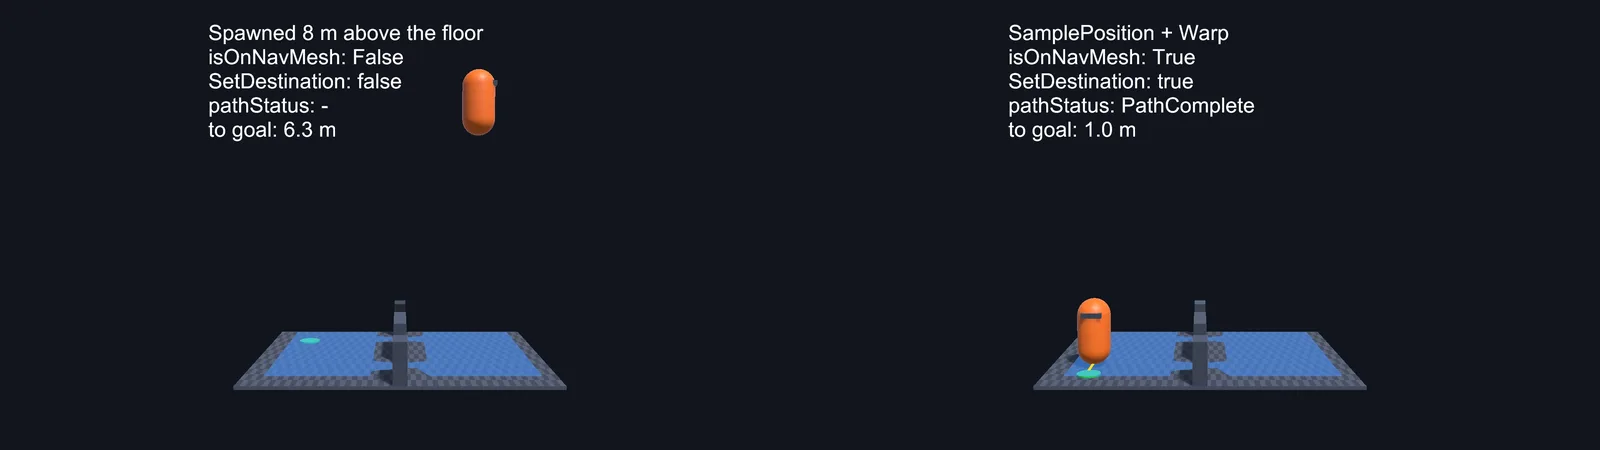
Agents float above the ground or sink into it
The NavMesh is a simplified surface, so on stairs, slopes and uneven ground it can sit a little above or below the real geometry. Tick Build Height Mesh on the NavMesh Surface and rebake. If the model is offset by the same amount everywhere, adjust Base Offset on the NavMesh Agent instead, or move the model so its pivot sits at the feet.
Still Broken? Check These
- The AI Navigation overlay is on and you can see blue NavMesh under the agent and under the destination.
- The agent’s Agent Type matches the NavMesh Surface’s Agent Type.
agent.isOnNavMeshis true at the moment you callSetDestination.SetDestinationreturns true, and the gizmo path above reaches the target.- Speed is above zero, Acceleration isn’t tiny, and Stopping Distance is smaller than the distance to the target.
- No other script, Rigidbody, CharacterController or root-motion Animator moves the same object.
- No carving NavMesh Obstacle surrounds the agent or blocks the only route. Disable Carve to test.
- The Area Mask includes every area the route crosses.
- For runtime bakes, the agent is enabled only after
BuildNavMesh()has finished. - Still stuck? Make a new scene with a plane, a NavMesh Surface and one agent with the click-to-move script. If that works, add your level’s pieces back one at a time until it breaks.
FAQ
Where is the Navigation window in Unity 6?
Baking moved to the NavMesh Surface component from the AI Navigation package. Window > AI > Navigation still exists, but it holds only the Agents and Areas settings. You bake from the NavMesh Surface inspector.
How do I bake a NavMesh in Unity 6?
Install AI Navigation, add a NavMesh Surface component to a GameObject in your scene, and click Bake. The result is saved as an asset next to the scene.
What does “SetDestination can only be called on an active agent” mean?
The agent isn’t on a NavMesh when you call it. Bake a NavMesh, match the agent type, or snap the agent onto the mesh with NavMesh.SamplePosition and Warp.
Can I bake a NavMesh at runtime?
Yes. Call BuildNavMesh() on a NavMeshSurface for a full bake, or UpdateNavMesh() for an asynchronous update after changes.
Does NavMesh work in 2D?
Not out of the box. AI Navigation bakes on 3D geometry. For 2D games, developers use community NavMesh tools for 2D or grid-based A* pathfinding instead.
NavMesh Obstacle or rebake?
Use a carving NavMesh Obstacle for individual objects that move or appear occasionally. Rebake with UpdateNavMesh when large parts of the level change.
Why does SetDestination return false?
The agent couldn’t request a path: it’s disabled, not placed on a NavMesh, or the NavMesh hasn’t been baked for its agent type. If it returns true but the agent stops early, the destination is unreachable and the path is only partial.
How do I make a NavMesh Agent play walk animations?
Turn off Apply Root Motion on the Animator and set a Speed float parameter from agent.velocity.magnitude every frame, with a little damping. A blend tree on that parameter switches between idle, walk and run.
Reader questions
Asked by readers of this article and answered by AI. Behavior can differ between Unity versions, so test in yours.

Leave a Reply