
Unity’s Timeline is a sequencing tool, like a small video editor inside the engine. You lay out animation, camera cuts, audio, objects turning on and off, and gameplay events on tracks against time, then play it all back in sync. It’s how most Unity games make cutscenes, intros, scripted moments and trailers. This Unity Timeline tutorial builds a complete cutscene in Unity 6: tracks and clips, animating characters, Cinemachine camera cuts, signals that call your code, triggering and skipping cutscenes, and handing control back to the player cleanly.
Install and Create Your First Timeline
Timeline is included in new Unity 6 projects. If it’s missing, install Timeline from Window > Package Manager > Unity Registry. Then:
- Create an empty GameObject called
Cutscene_Intro. - Open Window > Sequencing > Timeline. With the object selected, click Create in the Timeline window and save the asset (for example
Intro.playable).
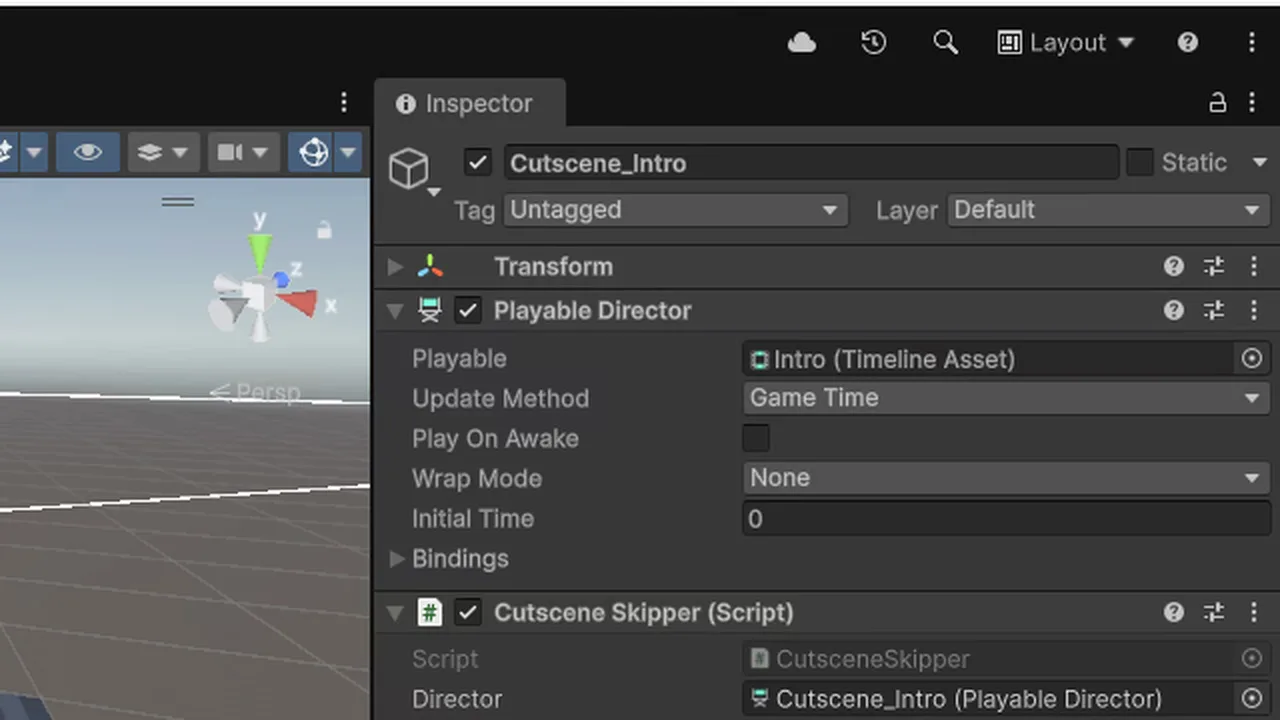
Unity adds a Playable Director component to the GameObject. Two concepts matter from here on:
- The Timeline asset (
.playable) holds the tracks and clips. It’s reusable and lives in your Assets folder. - The Playable Director plays that asset in a specific scene, and stores the bindings: which scene objects each track controls. The same Timeline asset can be bound to different characters in different scenes.
On the Playable Director, Play On Awake starts it when the scene loads (untick it for triggered cutscenes), and Wrap Mode decides what happens at the end: Hold keeps the last frame, Loop repeats, None stops and releases control.
Track Types Explained
Click the + button in the Timeline window to add tracks:
| Track | Binds to | Use it for |
|---|---|---|
| Activation Track | A GameObject | Turning objects on and off (props appear, UI hides, enemies spawn) |
| Animation Track | An Animator | Playing animation clips or recording keyframes directly |
| Audio Track | An AudioSource | Music, dialogue and sound effects in sync |
| Control Track | Prefabs, particle systems, nested Timelines | Starting effects, spawning objects, playing sub-sequences |
| Signal Track | A Signal Receiver | Calling scripts at a specific time |
| Playable Track | Custom playables | Your own clip types (advanced) |
| Cinemachine Track | A CinemachineBrain | Cutting and blending between cameras |
| Track Group | Nothing | Folders for organising tracks |
You can also drag a GameObject from the Hierarchy straight into the Timeline window; Unity offers the track types that fit it.
Animate Characters and Objects
There are two ways to animate with an Animation Track.
Use existing clips. Drag the character (with an Animator) onto the Timeline to create an Animation Track bound to it, then drag animation clips (walk, wave, sit) onto the track. Overlap two clips and Timeline creates an automatic blend, so walking eases into idle. Use each clip’s Inspector to set Clip In, speed, and Match Offsets so a second clip continues from where the first left the character instead of snapping back to the origin.
Record keyframes. Click the red record button on a track, scrub the playhead, and move or rotate objects in the Scene view. Timeline records keyframes into an Infinite Clip. Right-click it and choose Convert To Clip Track to make it a normal, movable clip. This is perfect for doors opening, cameras dollying and props moving.
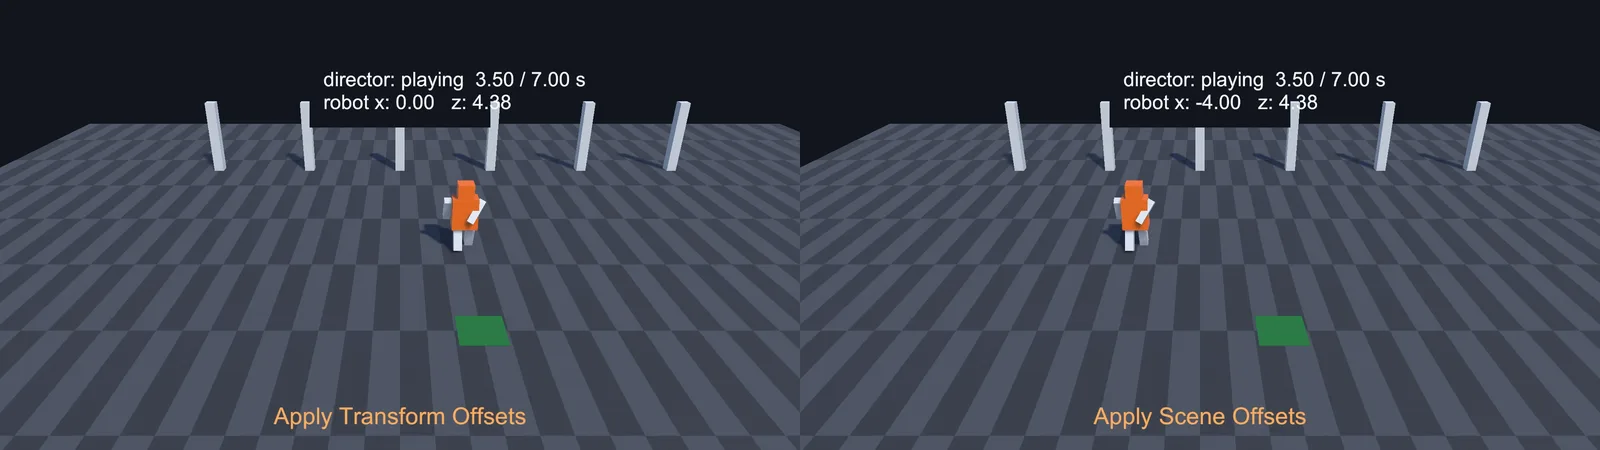
Positions in Animation clips are absolute by default. For a character that should walk from wherever it is, set the track’s Track Offsets to Apply Scene Offsets (or Apply Transform Offsets with an explicit start pose). If a character snaps to the world origin when the cutscene starts, this is why.
If the Animator itself misbehaves outside the Timeline, our Animator troubleshooting guide covers the usual causes.
Camera Cuts with Cinemachine
Cutscenes need multiple camera angles. With the Cinemachine package installed:
- Make sure your Main Camera has a CinemachineBrain (it gets one automatically when you create a Cinemachine Camera).
- Create a Cinemachine Camera for each shot (GameObject > Cinemachine > Cinemachine Camera): a wide establishing shot, an over-the-shoulder shot, a close-up. Use Tracking Target and Position/Rotation Control so they follow and frame the characters.
- Add a Cinemachine Track bound to the Main Camera’s CinemachineBrain.
- Right-click the track and add Cinemachine Shot clips, assigning one camera to each. Back-to-back clips make hard cuts; overlapping clips create a smooth blend for the length of the overlap.
The gameplay camera can stay as another Cinemachine Camera with a lower priority. When the Timeline ends with Wrap Mode None, the Brain returns to the highest-priority camera, blending back to gameplay automatically. Our Cinemachine 3 third-person camera guide covers the gameplay side.
Signals: Calling Code from the Timeline
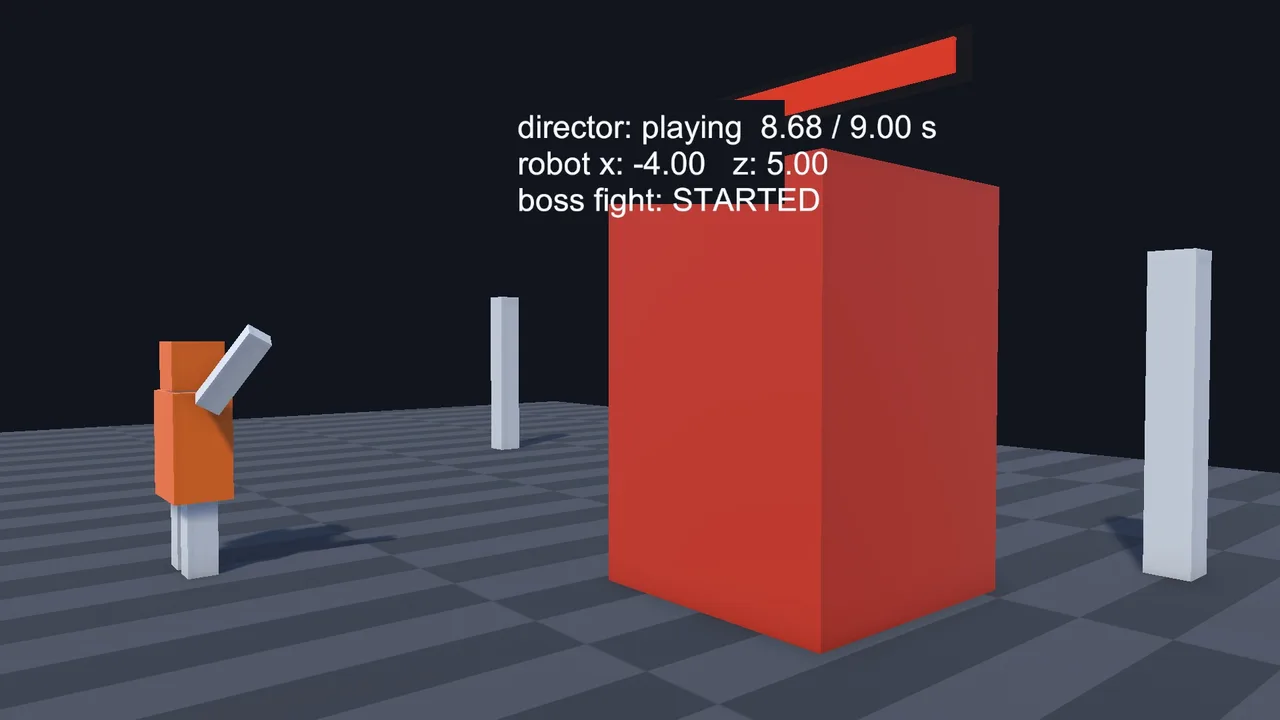
Signals fire events at an exact moment: show a subtitle, start a quest, play footstep dust, spawn the boss.
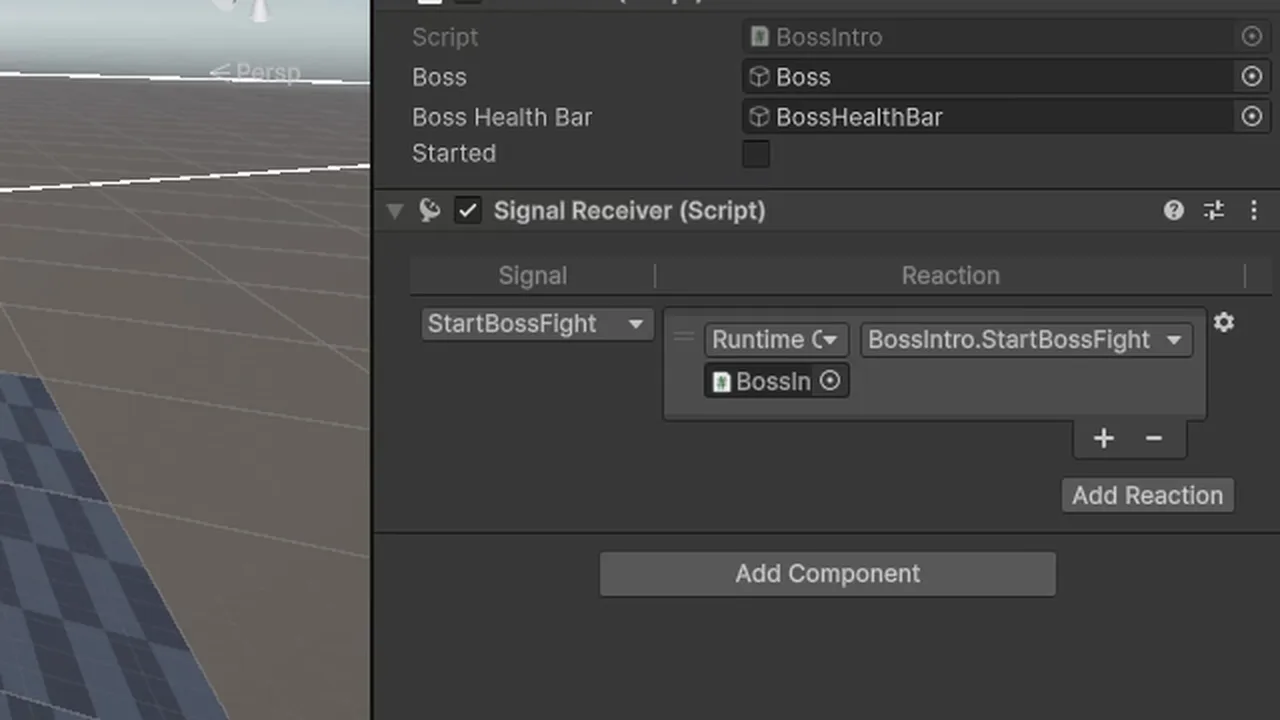
- Create a Signal Asset: Assets > Create > Timeline > Signal, named for the event (
ShowTitle,StartBossFight). - Add a Signal Track and bind it to a GameObject. Unity offers to add a Signal Receiver component.
- Right-click the track at the right time and add a Signal Emitter; choose your Signal Asset.
- On the Signal Receiver, add a reaction for that signal and wire it to any public method, just like a UnityEvent button.
Signal receivers call methods in the scene, so they’re the clean bridge between a cutscene and gameplay code. For example, a receiver method could look like this:
public class BossIntro : MonoBehaviour
{
    [SerializeField] BossAI boss;
    [SerializeField] GameObject bossHealthBar;

    public void StartBossFight()
    {
        bossHealthBar.SetActive(true);
        boss.enabled = true;
    }
}
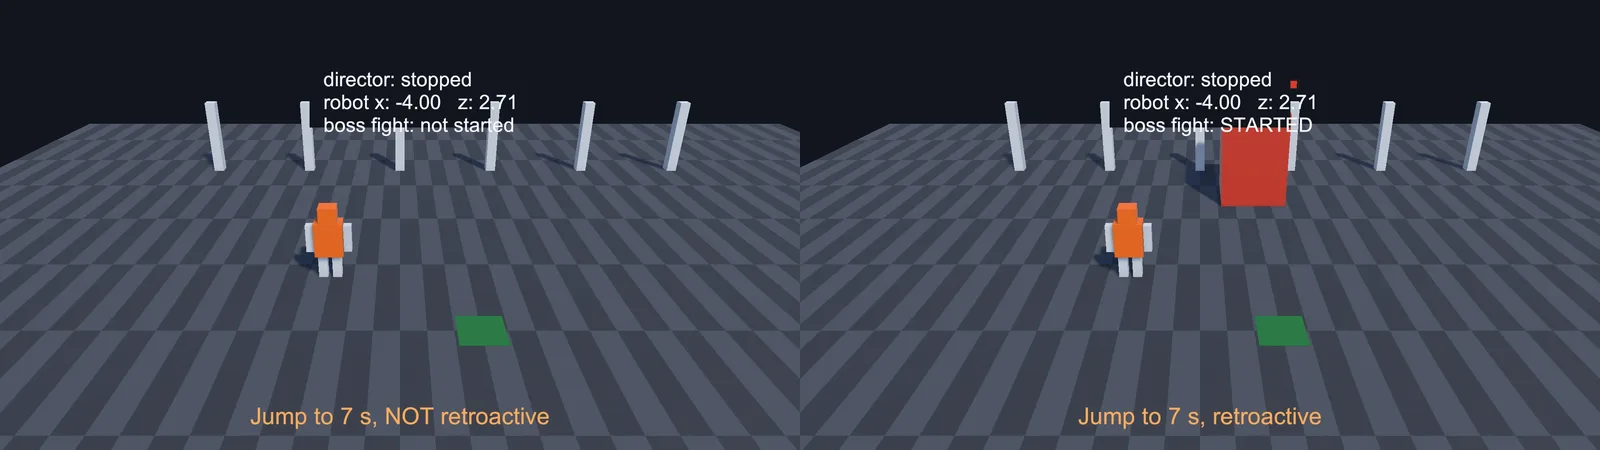
Emitters have options worth knowing: Retroactive fires the signal even if playback jumped past it (important when skipping), and Emit Once stops it firing again when a Timeline loops.
Trigger a Cutscene from Gameplay
Most cutscenes start when the player enters an area. Untick Play On Awake on the Playable Director, add a trigger collider to the area, and add:
using UnityEngine;
using UnityEngine.Playables;

public class CutsceneTrigger : MonoBehaviour
{
    [SerializeField] PlayableDirector director;
    [SerializeField] PlayerController player;
    bool played;

    void OnEnable() => director.stopped += OnCutsceneEnded;
    void OnDisable() => director.stopped -= OnCutsceneEnded;

    void OnTriggerEnter(Collider other)
    {
        if (played || !other.CompareTag("Player")) return;
        played = true;
        player.enabled = false;   // stop movement and input during the scene
        director.Play();
    }

    void OnCutsceneEnded(PlayableDirector d)
    {
        player.enabled = true;
    }
}
The stopped event only fires when playback really stops, which needs Wrap Mode None. With Hold, the director keeps holding the last frame and never “stops”. If you need Hold, check director.time >= director.duration yourself or put a Signal at the end.
A better pattern than disabling the whole controller is switching the Input System’s action map (playerInput.SwitchCurrentActionMap("Cutscene")) to one that only has a Skip action. Our Input System tutorial explains action maps.
Skipping and Returning Control
Players will want to skip. The safe way is to jump to the end and let everything settle:
public void Skip()
{
    if (director.state != PlayState.Playing) return;
    director.time = director.duration;
    director.Evaluate();   // apply the final frame: positions, activations
    director.Stop();       // fires the stopped event
}
Jumping straight to the end skips signals unless they’re marked Retroactive. Mark every emitter that changes game state (enabling the boss, giving an item, setting a flag) as Retroactive, or skipping will leave the game in a broken half-state. Purely cosmetic signals (camera shake, a sound) can stay non-retroactive.
Also think about where characters end up. With Wrap Mode None, animated objects return to their pre-cutscene state when the director stops, unless the final positions are baked in. If the player should stay where the cutscene left them, either set Wrap Mode to Hold and stop it manually after copying the pose, or move the real player to a marker in your OnCutsceneEnded handler.
🎬 Learn to tell stories with the camera
Shot composition, pacing and cinematic language are covered well in a couple of the books on our game developer reading list.
Workflow Tips
- Lock the Timeline window (padlock icon) so selecting other objects doesn’t switch it away from your cutscene.
- Use Track Groups per character or per shot. Big cutscenes get messy fast.
- Use nested Timelines (Control Track with a sub-Timeline) for reusable pieces, such as a door-opening sequence used in several cutscenes.
- Preview without Play mode by scrubbing. Note that scripts don’t run during preview, so signal reactions only happen in Play mode.
- Render trailers with the Recorder package, which captures a Timeline to video or image sequences at a fixed frame rate.
Troubleshooting
The character snaps to the world origin when the cutscene starts
The Animation Track uses absolute positions. Set Track Offsets to Apply Scene Offsets, or use Match Offsets on clips.
Objects reset to their old positions after the cutscene
Wrap Mode None restores pre-Timeline values when the director stops. Use Hold, or set final positions in code when the cutscene ends.
The stopped event never fires
Wrap Mode is Hold or Loop. Use None, or detect the end with a Signal at the last frame.
Signals don’t fire
The Signal Track isn’t bound to an object with a Signal Receiver, the receiver has no reaction for that Signal Asset, or you’re scrubbing in Edit mode. When skipping, mark the emitters Retroactive.
The Animator plays its own animation over the Timeline
Timeline overrides the Animator while the track is active, but the Animator Controller takes over when the clip ends. To hold a pose afterwards, extend the clip, set the clip’s Post-Extrapolation to Hold, or set the Animator’s state when the cutscene ends.
Bindings are missing after duplicating the cutscene
Bindings live on the Playable Director in the scene, not in the Timeline asset. A duplicated director or a new scene needs its tracks rebound in the Timeline window.
FAQ
What is Timeline in Unity used for?
Sequencing animation, cameras, audio, object activation and events over time. It’s mainly used for cutscenes, scripted gameplay moments, intros and trailers.
How do I play a Timeline from a script?
Reference the PlayableDirector and call Play(). Untick Play On Awake so it only starts when you call it.
How do I skip a Timeline cutscene?
Set director.time to director.duration, call Evaluate() and then Stop(). Mark important Signal Emitters as Retroactive so their events still fire.
Can Timeline call functions?
Yes, with Signals. A Signal Emitter on a Signal Track triggers reactions on a Signal Receiver component, which can call any public method.
Do I need Cinemachine for Timeline cutscenes?
No, but it makes camera cuts and blends much easier. Without it, you’d animate one camera’s transform or use Activation Tracks to switch cameras.
What is the difference between Timeline and Animator?
The Animator handles state-based character animation that reacts to gameplay. Timeline plays fixed, authored sequences across many objects at once.
Reader questions
Asked by readers of this article and answered by AI. Behavior can differ between Unity versions, so test in yours.
Leave a Reply